
Animation Actors
Learn to create an animation notify that lets you add actors to your animations.
This is an in-depth walkthrough to creating this class. If you just want the code, it can be found on Unreal Engine’s Learning site.

Introduction
In a lot of ability-centric video games (fighting games, hero shooters, so on), characters often use actors in their ability animations:
Bugs Bunny spawns a hammer for his basic attacks in MultiVersus.
Junker Queen spawns an axe for her Carnage ability in Overwatch.
Mario spawns a cape for his side special in Super Smash Bros..
Unlike most of the actors we deal with when making games, which usually compose or interact with the game’s framework or gameplay systems (pawns, controllers, environment actors, etc.), these actors (which I’ll be calling animation actors) serve no gameplay purpose and have no side effects. They function more like visual effects: transient and purely cosmetic.
Possible Approaches
Trying to manage these actors inside our ability logic — e.g. calling Play Animation, then calling Spawn Actor in a blueprint script — wouldn’t be practical. It would be unintuitive for our animators, make the animations difficult to iterate on, and could result in visual synchronization issues between the animation and the actor if we didn’t batch these calls properly in a multiplayer game.
Since these actors are effectively a part of the animation, we should manage them from within the animation itself. The solution for this in Unreal Engine is the Animation Notify: a timed event you can add to animations directly in the timeline.
As of UE 5.5, Unreal doesn’t have a built-in notify for spawning actors, so I’ll show you how to make one! This notify will be able to spawn actors within an animation (we’ll be spawning mesh actors, but you could modify this notify to allow any actor to be spawned). It will support both static and skeletal meshes, allow you to play animations on spawned skeletal mesh actors, allow you to override the mesh’s materials, and we’ll be able to preview it in real-time in the animation editor.
If you want to skip the tutorial and just see the code, you can find the source code for this class here But note that it has some features specific to Cloud Crashers (the game I created this for), like support for first- and third-person animations.
Implementation
Creating a Notify Class
Animation notifies come in two flavors: AnimNotify and AnimNotifyState. The former is a simple “fire-and-forget” event that executes its code and disappears. But the latter instantiates an object that remains alive for a specified duration within its animation, maintaining a persistent state while active.
We want our spawned actors to be destroyed automatically—either at the end of the animation, or at a specified time within it. Normal animation notifies don’t maintain a state after being triggered, so they have no way to store a reference to the spawned actor to destroy it later.
Instead, we’ll use a notify state that spawns our animation actor when it starts, and destroys the actor when it ends. Since notify states are, obviously, stateful, we’ll be able to cache a reference to the spawned actor at the start of the notify, so we can destroy it at the end.
Let’s start by creating the new animation notify class. The parent class should be AnimNotifyState, and we’ll name it AnimNotifyState_SpawnAnimActor.
AnimNotify_ and AnimNotifyState_ are the standard naming conventions for animation notifies in Unreal.

The first thing we want to do is add some important class specifiers to our new UClass:
UCLASS(Const, HideCategories = Object, CollapseCategories, DisplayName = "Spawn Animation Actor")
class GAME_API UAnimNotifyState_SpawnAnimActor : public UAnimNotifyState
{
// ...Const: Prevents our notify from changing during runtime. We can still edit our notifies in the editor, but we wouldn’t want them somehow changing while playing the game.HideCategories: Notifies are technicallyUObjectclasses that we edit inside the animation asset editor. Hiding the object’s properties allows us to just focus on the notify’s properties. This just makes it easier to work with; it will appear more like an event or node with parameters, rather than a class.CollapseCategories: This formats all the notify’s properties into one category to, again, make it nicer to work with.DisplayName: This is the name that will appear in theAdd Notify State...pop-up when adding notifies to your animations.
This isn’t just a feature; it’s a tool for our animators. So we want to make it as intuitive and streamlined as possible to work with!
Before we start implementing the notify itself, we can add one more feature to improve our workflow:
// AnimNotifyState_SpawnAnimActor.h

public:

	// Default constructor.
	UAnimNotifyState_SpawnAnimActor();
// AnimNotifyState_SpawnAnimActor.cpp
UAnimNotifyState_SpawnAnimActor::UAnimNotifyState_SpawnAnimActor()
{
#if WITH_EDITORONLY_DATA
NotifyColor = FColor(255, 25, 150);
#endif
}This changes the color (in RGB) of the notify in the editor so it’s easier to distinguish. I chose a nice coral color.
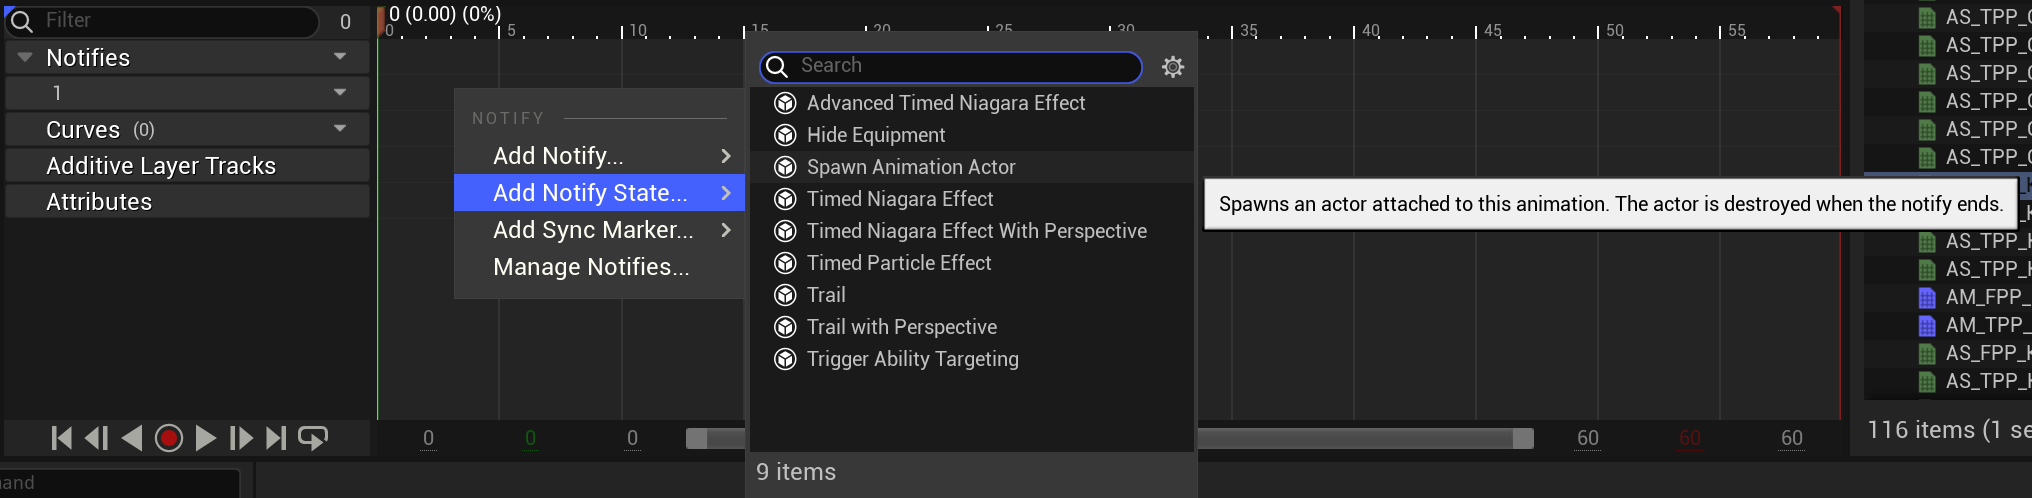
If you compile this, open up an animation sequence or montage, and right-click in the timeline, you should see our new notify!
Spawning the Actor
When our notify state starts, we want to spawn our actor, and when it ends, we want to destroy it. Luckily for us, the AnimNotifyState class has virtual functions for both of these events. Let’s start with the first:
// AnimNotifyState_SpawnAnimActor.h

public:

    // Spawns the actor defined by this notify.
    virtual void NotifyBegin(USkeletalMeshComponent* MeshComp, UAnimSequenceBase* Animation, float TotalDuration, const FAnimNotifyEventReference& EventReference) override;
AnimNotifyState has two virtual functions with this name, but one of them is deprecated. The correct one has an EventReference parameter.
// AnimNotifyState_SpawnAnimActor.cpp

void UAnimNotifyState_SpawnAnimActor::NotifyBegin(USkeletalMeshComponent* MeshComp, UAnimSequenceBase* Animation, float TotalDuration, const FAnimNotifyEventReference& EventReference)
{
    Super::NotifyBegin(MeshComp, Animation, TotalDuration, EventReference);
}
Before we can spawn our actor, we have to know what we actually want to spawn.
For most use-cases, we’ll want to spawn some kind of mesh: Bugs Bunny’s hammer, Junker Queen’s axe, Mario’s cape, etc. If we let our notify spawn any actor with a reference to its class, we’d have to create a different actor class for every single mesh we spawn. Not only does that waste time and memory, but it’s also really unintuitive to force our animators to create another actor class every time they want to spawn something in an animation.
Instead, our notify will spawn a mesh actor, and its parameters will define which mesh to use for that actor. This provides a significantly better workflow, and it still covers most—if not all—use-cases. We’ll also see that restricting our spawned actors to meshes actually gives us more flexibility, because we’ll be able to add mesh-specific options, like playing animations and customizing materials.
Now that we know that we’re spawning a mesh actor, let’s define the parameters we’ll use to spawn the mesh:
protected:

    // Static or skeletal mesh asset to spawn. Must be a skeletal mesh to use ActorAnimation.
    UPROPERTY(EditAnywhere, BlueprintReadWrite, Category = "AnimNotify", Meta = (AllowedClasses = "/Script/Engine.SkeletalMesh /Script/Engine.StaticMesh"))
    TObjectPtr<UStreamableRenderAsset> MeshToSpawn;

    // Optional socket at which to attach the animation actor. "None" to not attach the spawned actor.
    UPROPERTY(EditAnywhere, BlueprintReadWrite, Category = "AnimNotify")
    FName AttachSocket;

    // Transform with which to spawn the animation actor, relative to AttachSocket if it's set.
    UPROPERTY(EditAnywhere, BlueprintReadWrite, Category = "AnimNotify", DisplayName = "Relative Transform")
    FTransform SpawnTransform;

    // Whether to override the spawned mesh's materials.
    UPROPERTY(EditAnywhere, BlueprintReadWrite, Category = "AnimNotify", DisplayName = "Enable Material Overrides")
    uint32 bOverrideMaterials : 1;

    /* The materials to use for each of the spawned mesh's material indices. Overrides the mesh's default materials.
     * Indices without a valid material will be skipped, and revert to the mesh's default material for that index. */
    UPROPERTY(EditAnywhere, BlueprintReadWrite, Category = "AnimNotify", Meta = (EditCondition = "bOverrideMaterials", EditConditionHides = "true", ScriptName = "MaterialOverrides"))
    TArray<TObjectPtr<UMaterialInterface>> OverrideMaterials;

    // The overlay material to apply to the mesh.
    UPROPERTY(EditAnywhere, BlueprintReadWrite, Category = "AnimNotify", Meta = (EditCondition = "bOverrideMaterials", EditConditionHides = "true"))
    TObjectPtr<UMaterialInterface> OverlayMaterial;

    // Optional animation to play on the animation actor when spawned, if it's a skeletal mesh.
    UPROPERTY(EditAnywhere, BlueprintReadWrite, Category = "AnimNotify", DisplayName = "Actor Animation to Play")
    TObjectPtr<UAnimationAsset> ActorAnimation;

    // Whether the actor animation should loop.
    UPROPERTY(EditAnywhere, BlueprintReadWrite, Category = "AnimNotify", DisplayName = "Loop Actor Animation?")
    bool ActorAnimationLoops;
The AllowedClasses specifier on MeshToSpawn restricts this property to assets of type SkeletalMesh or StaticMesh, since their common parent, StreamableRenderAsset, has other subclasses.
The ScriptName specifier on OverrideMaterials is required to differentiate this variable from bOverrideMaterials, since their names will appear the same in some places (e.g. any scripts using Python).
Hopefully these parameters are self-explanatory: when our notify begins, we want to spawn a mesh actor at SpawnTransform, attach it to AttachSocket, set its mesh to MeshToSpawn, override any specified materials, and play (or loop) an optional animation on it. If that sounds like a lot, don’t worry; these steps are all fairly concise.
First, we want to make sure we actually have a mesh to spawn and a world to spawn it in:
void UAnimNotifyState_SpawnAnimActor::NotifyBegin(USkeletalMeshComponent* MeshComp, UAnimSequenceBase* Animation, float TotalDuration, const FAnimNotifyEventReference& EventReference)
{
    Super::NotifyBegin(MeshComp, Animation, TotalDuration, EventReference);

    // Retrieve the world to spawn our actor.
    UWorld* World = MeshComp->GetWorld();
    if (!World)
    {
        return;
    }

    // Make sure we have a mesh to spawn and a mesh comp to attach it to.
    if (!MeshToSpawn || !MeshComp)
    {
        if (!World->IsPreviewWorld())
        {
            UE_LOG(LogAnimation, Error, TEXT("Attempted to spawn animation actor in animation (%s), but no mesh to spawn was specified."), *GetNameSafe(Animation));
        }

        return;
    }
}
We check if we’re in a preview world to avoid spamming error messages when we’ve added the notify to an animation, but haven’t selected a mesh yet.
Next, we’ll spawn our new mesh actor. This will just be an empty actor with a mesh component, since that’s all we need.
Unreal Engine actually has built-in actor classes for this (it’s what gets spawned when you drag a mesh asset into your level): AStaticMeshActor and ASkeletalMeshActor, for static and skeletal meshes, respectively.
We want to support static meshes and skeletal meshes. But we need to handle spawning slightly differently depending on which of these we want to spawn. That means we need different spawning code depending on whether our notify is using a static mesh or a skeletal mesh.
Let’s start with static meshes. If our MeshToSpawn is a static mesh asset, we want to spawn a StaticMeshActor with our notify’s parameters and set its mesh to our MeshToSpawn. We also need to initialize its mobility, so we can optionally attach it later.
// Spawn a static mesh actor if the mesh to spawn is a static mesh.
if (MeshToSpawn->IsA(UStaticMesh::StaticClass()))
{
    if (AStaticMeshActor* SpawnedActorStatic = World->SpawnActorDeferred<AStaticMeshActor>(AStaticMeshActor::StaticClass(), SpawnTransform, MeshComp->GetOwner()))
    {
        SpawnedActorStatic->SetMobility(EComponentMobility::Type::Movable);
        SpawnedActorStatic->GetStaticMeshComponent()->SetStaticMesh(Cast<UStaticMesh>(MeshToSpawn));
    }
}
We’re using SpawnActorDeferred so we can finish initializing the actor before it actually gets added to the world.
For skeletal meshes, we can do the exact same thing, but we need to spawn SkeletalMeshActor instead:
// Spawn a static mesh actor if the mesh to spawn is a static mesh.
if (MeshToSpawn->IsA(UStaticMesh::StaticClass()))
{
    if (AStaticMeshActor* SpawnedActorStatic = World->SpawnActorDeferred<AStaticMeshActor>(AStaticMeshActor::StaticClass(), SpawnTransform, MeshComp->GetOwner()))
    {
        SpawnedActorStatic->GetStaticMeshComponent()->SetStaticMesh(Cast<UStaticMesh>(MeshToSpawn));
        SpawnedActorStatic->SetMobility(EComponentMobility::Type::Movable);
    }
}
// Spawn a skeletal mesh actor if the mesh to spawn is a skeletal mesh.
else
{
    if (ASkeletalMeshActor* SpawnedActorSkeletal = World->SpawnActorDeferred<ASkeletalMeshActor>(ASkeletalMeshActor::StaticClass(), SpawnTransform, MeshComp->GetOwner()))
    {
        SpawnedActorSkeletal->GetSkeletalMeshComponent()->SetSkeletalMesh(Cast<USkeletalMesh>(MeshToSpawn));
    }
}
Remember that we want to destroy this actor later, so we should cache it in a new variable:
// AnimNotifyState_SpawnAnimActor.h

private:

    // The actor spawned by this notify, that will be destroyed when the notify ends.
    UPROPERTY()
    TObjectPtr<AActor> SpawnedActor;
// AnimNotifyState_SpawnAnimActor.cpp
// Spawn a static mesh actor if the mesh to spawn is a static mesh.
if (MeshToSpawn->IsA(UStaticMesh::StaticClass()))
{
if (AStaticMeshActor* SpawnedActorStatic = World->SpawnActorDeferred<AStaticMeshActor>(AStaticMeshActor::StaticClass(), SpawnTransform, MeshComp->GetOwner()))
{
SpawnedActorStatic->GetStaticMeshComponent()->SetStaticMesh(Cast<UStaticMesh>(MeshToSpawn));
SpawnedActorStatic->SetMobility(EComponentMobility::Type::Movable);
SpawnedActor = SpawnedActorStatic;
}
}
// Spawn a skeletal mesh actor if the mesh to spawn is a skeletal mesh.
else
{
if (ASkeletalMeshActor* SpawnedActorSkeletal = World->SpawnActorDeferred<ASkeletalMeshActor>(ASkeletalMeshActor::StaticClass(), SpawnTransform, MeshComp->GetOwner()))
{
SpawnedActorSkeletal->GetSkeletalMeshComponent()->SetSkeletalMesh(Cast<USkeletalMesh>(MeshToSpawn));
SpawnedActor = SpawnedActorSkeletal;
}
}Once we’ve spawned our actor, we can configure it using our notify’s parameters. We do this outside of our branches because this configuration is the same for both static and skeletal meshes, so we can avoid repeating our code.
// Set up the spawned actor.
if (ensure(SpawnedActor))
{
    SpawnedActor->SetActorEnableCollision(false);
    SpawnedActor->AttachToComponent(MeshComp, FAttachmentTransformRules::KeepRelativeTransform, AttachSocket);
    SpawnedActor->FinishSpawning(SpawnTransform);
}
For skeletal meshes, we also want to configure their animation (since static meshes can’t play animations):
// ...
else
{
    if (ASkeletalMeshActor* SpawnedActorSkeletal = World->SpawnActorDeferred<ASkeletalMeshActor>(ASkeletalMeshActor::StaticClass(), SpawnTransform, MeshComp->GetOwner()))
    {
        SpawnedActorSkeletal->GetSkeletalMeshComponent()->SetSkeletalMesh(Cast<USkeletalMesh>(MeshToSpawn));
        SpawnedActor = SpawnedActorSkeletal;

        if (SpawnedActorSkeletal)
        {
            SpawnedActorSkeletal->GetSkeletalMeshComponent()->PlayAnimation(ActorAnimation, ActorAnimationLoops);
        }
    }
}
Lastly, we want to apply our material overrides. This takes a bit more work, so let’s make it a helper function:
// AnimNotifyState_SpawnAnimActor.h

private:

	// Applies optional material overrides to the given mesh component.
	void ApplyMaterialOverrides(UMeshComponent* MeshComp);
// AnimNotifyState_SpawnAnimActor.cpp
void UAnimNotifyState_SpawnAnimActor::ApplyMaterialOverrides(UMeshComponent* MeshComp)
{
if (bOverrideMaterials && IsValid(MeshComp))
{
const int32 NumOverrideMaterials = FMath::Min(OverrideMaterials.Num(), MeshComp->GetNumMaterials());
for (int32 OverrideIndex = 0; OverrideIndex < NumOverrideMaterials; ++OverrideIndex)
{
if (UMaterialInterface* OverrideMat = OverrideMaterials[OverrideIndex])
{
MeshComp->SetMaterial(OverrideIndex, OverrideMat);
}
}
if (OverlayMaterial)
{
MeshComp->SetOverlayMaterial(OverlayMaterial);
}
}
}Now, our final NotifyBegin function looks like this:
void UAnimNotifyState_SpawnAnimActor::NotifyBegin(USkeletalMeshComponent* MeshComp, UAnimSequenceBase* Animation, float TotalDuration, const FAnimNotifyEventReference& EventReference)
{
    Super::NotifyBegin(MeshComp, Animation, TotalDuration, EventReference);

    // Retrieve the world to spawn our actor.
    UWorld* World = MeshComp->GetWorld();
    if (!World)
    {
        return;
    }

    // Make sure we have a mesh to spawn and a mesh comp to attach it to.
    if (!MeshToSpawn || !MeshComp)
    {
        if (!World->IsPreviewWorld())
        {
            UE_LOG(LogAnimation, Error, TEXT("Attempted to spawn animation actor in animation (%s), but no mesh to spawn was specified."), *GetNameSafe(Animation));
        }

        return;
    }

    // Spawn a static mesh actor if the mesh to spawn is a static mesh.
    if (MeshToSpawn->IsA(UStaticMesh::StaticClass()))
    {
        if (AStaticMeshActor* SpawnedActorStatic = World->SpawnActorDeferred<AStaticMeshActor>(AStaticMeshActor::StaticClass(), SpawnTransform, MeshComp->GetOwner()))
        {
            SpawnedActorStatic->GetStaticMeshComponent()->SetStaticMesh(Cast<UStaticMesh>(MeshToSpawn));
            SpawnedActorStatic->SetMobility(EComponentMobility::Type::Movable);
            ApplyMaterialOverrides(SpawnedActorStatic->GetStaticMeshComponent());
            SpawnedActor = SpawnedActorStatic;
        }
    }
    // Spawn a skeletal mesh actor if the mesh to spawn is a skeletal mesh.
    else
    {
        if (ASkeletalMeshActor* SpawnedActorSkeletal = World->SpawnActorDeferred<ASkeletalMeshActor>(ASkeletalMeshActor::StaticClass(), SpawnTransform, MeshComp->GetOwner()))
        {
            SpawnedActorSkeletal->GetSkeletalMeshComponent()->SetSkeletalMesh(Cast<USkeletalMesh>(MeshToSpawn));
            ApplyMaterialOverrides(SpawnedActorSkeletal->GetSkeletalMeshComponent());
            SpawnedActor = SpawnedActorSkeletal;

            if (SpawnedActorSkeletal)
            {
                SpawnedActorSkeletal->GetSkeletalMeshComponent()->PlayAnimation(ActorAnimation, ActorAnimationLoops);
            }
        }
    }

    // Set up the spawned actor.
    if (ensure(SpawnedActor))
    {
        SpawnedActor->SetActorEnableCollision(false);
        SpawnedActor->AttachToComponent(MeshComp, FAttachmentTransformRules::KeepRelativeTransform, AttachSocket);
        SpawnedActor->FinishSpawning(SpawnTransform);
    }
}
Destroying the Actor
Before we test out our new notify, we want to make sure it gets cleaned up properly. In this case, all we need to do is make sure our spawned actor gets destroyed when the notify ends.
As before, AnimNotifyState has a virtual function for this event:
public:

	// Destroys the animation actor when the notify ends.
	virtual void NotifyEnd(USkeletalMeshComponent* MeshComp, UAnimSequenceBase* Animation, const FAnimNotifyEventReference& EventReference) override;
Again, make sure you’re using the non-deprecated version of this function.
Inside, we could just destroy the spawned actor immediately. But this could lead to situations where other timed events get preemptively cancelled. For example, if we played an animation on our spawned actor, and that animation triggered a particle effect, then that particle effect would disappear when the animation ends, which isn’t what we’d want.
Instead, we can use the SetLifeSpan function to tell the actor to wait a certain amount of time, and then destroy itself. In the meantime, we can hide the mesh so it still looks like it’s been destroyed.
void UAnimNotifyState_SpawnAnimActor::NotifyBegin(USkeletalMeshComponent* MeshComp, UAnimSequenceBase* Animation, float TotalDuration, const FAnimNotifyEventReference& EventReference)
{
    Super::NotifyEnd(MeshComp, Animation, EventReference);

    // Destroy the animation actor, if one was spawned.
    if (IsValid(SpawnedActor))
    {
        /* We let the actor stick around for a second before destroying it, but we hide its mesh. This is to let any
         * other timed events (e.g. a particle effect spawned by the spawned actor's animation) finish before the actor
         * is destroyed. */
        SpawnedActor->SetLifeSpan(1.0f);
        SpawnedActor->ForEachComponent(false, [](UActorComponent* InComponent)
        {
            if (UMeshComponent* CompAsMesh = Cast<UMeshComponent>(InComponent))
            {
                CompAsMesh->SetHiddenInGame(true, false);
            }
        });
    }
}
Final Result
Now that we’re properly spawning and destroying an actor, our notify is ready to use!
To try it out, right-click the timeline of any animation sequence or montage, hover over Add Notify State..., and select our new animation notify class.

The notify will appear as a bar with anchors on either side. This represents the duration when the notify is active. Drag the left anchor to when you want to spawn the actor, and drag the right anchor to when you want to destroy it.

You can drag the anchors to start and end of the timeline to make the actor appear for the animation’s entire duration.
Click on the notify to view its properties in the Details panel. From here, you can set the variables we defined in our C++ class to customize this notify’s behavior.
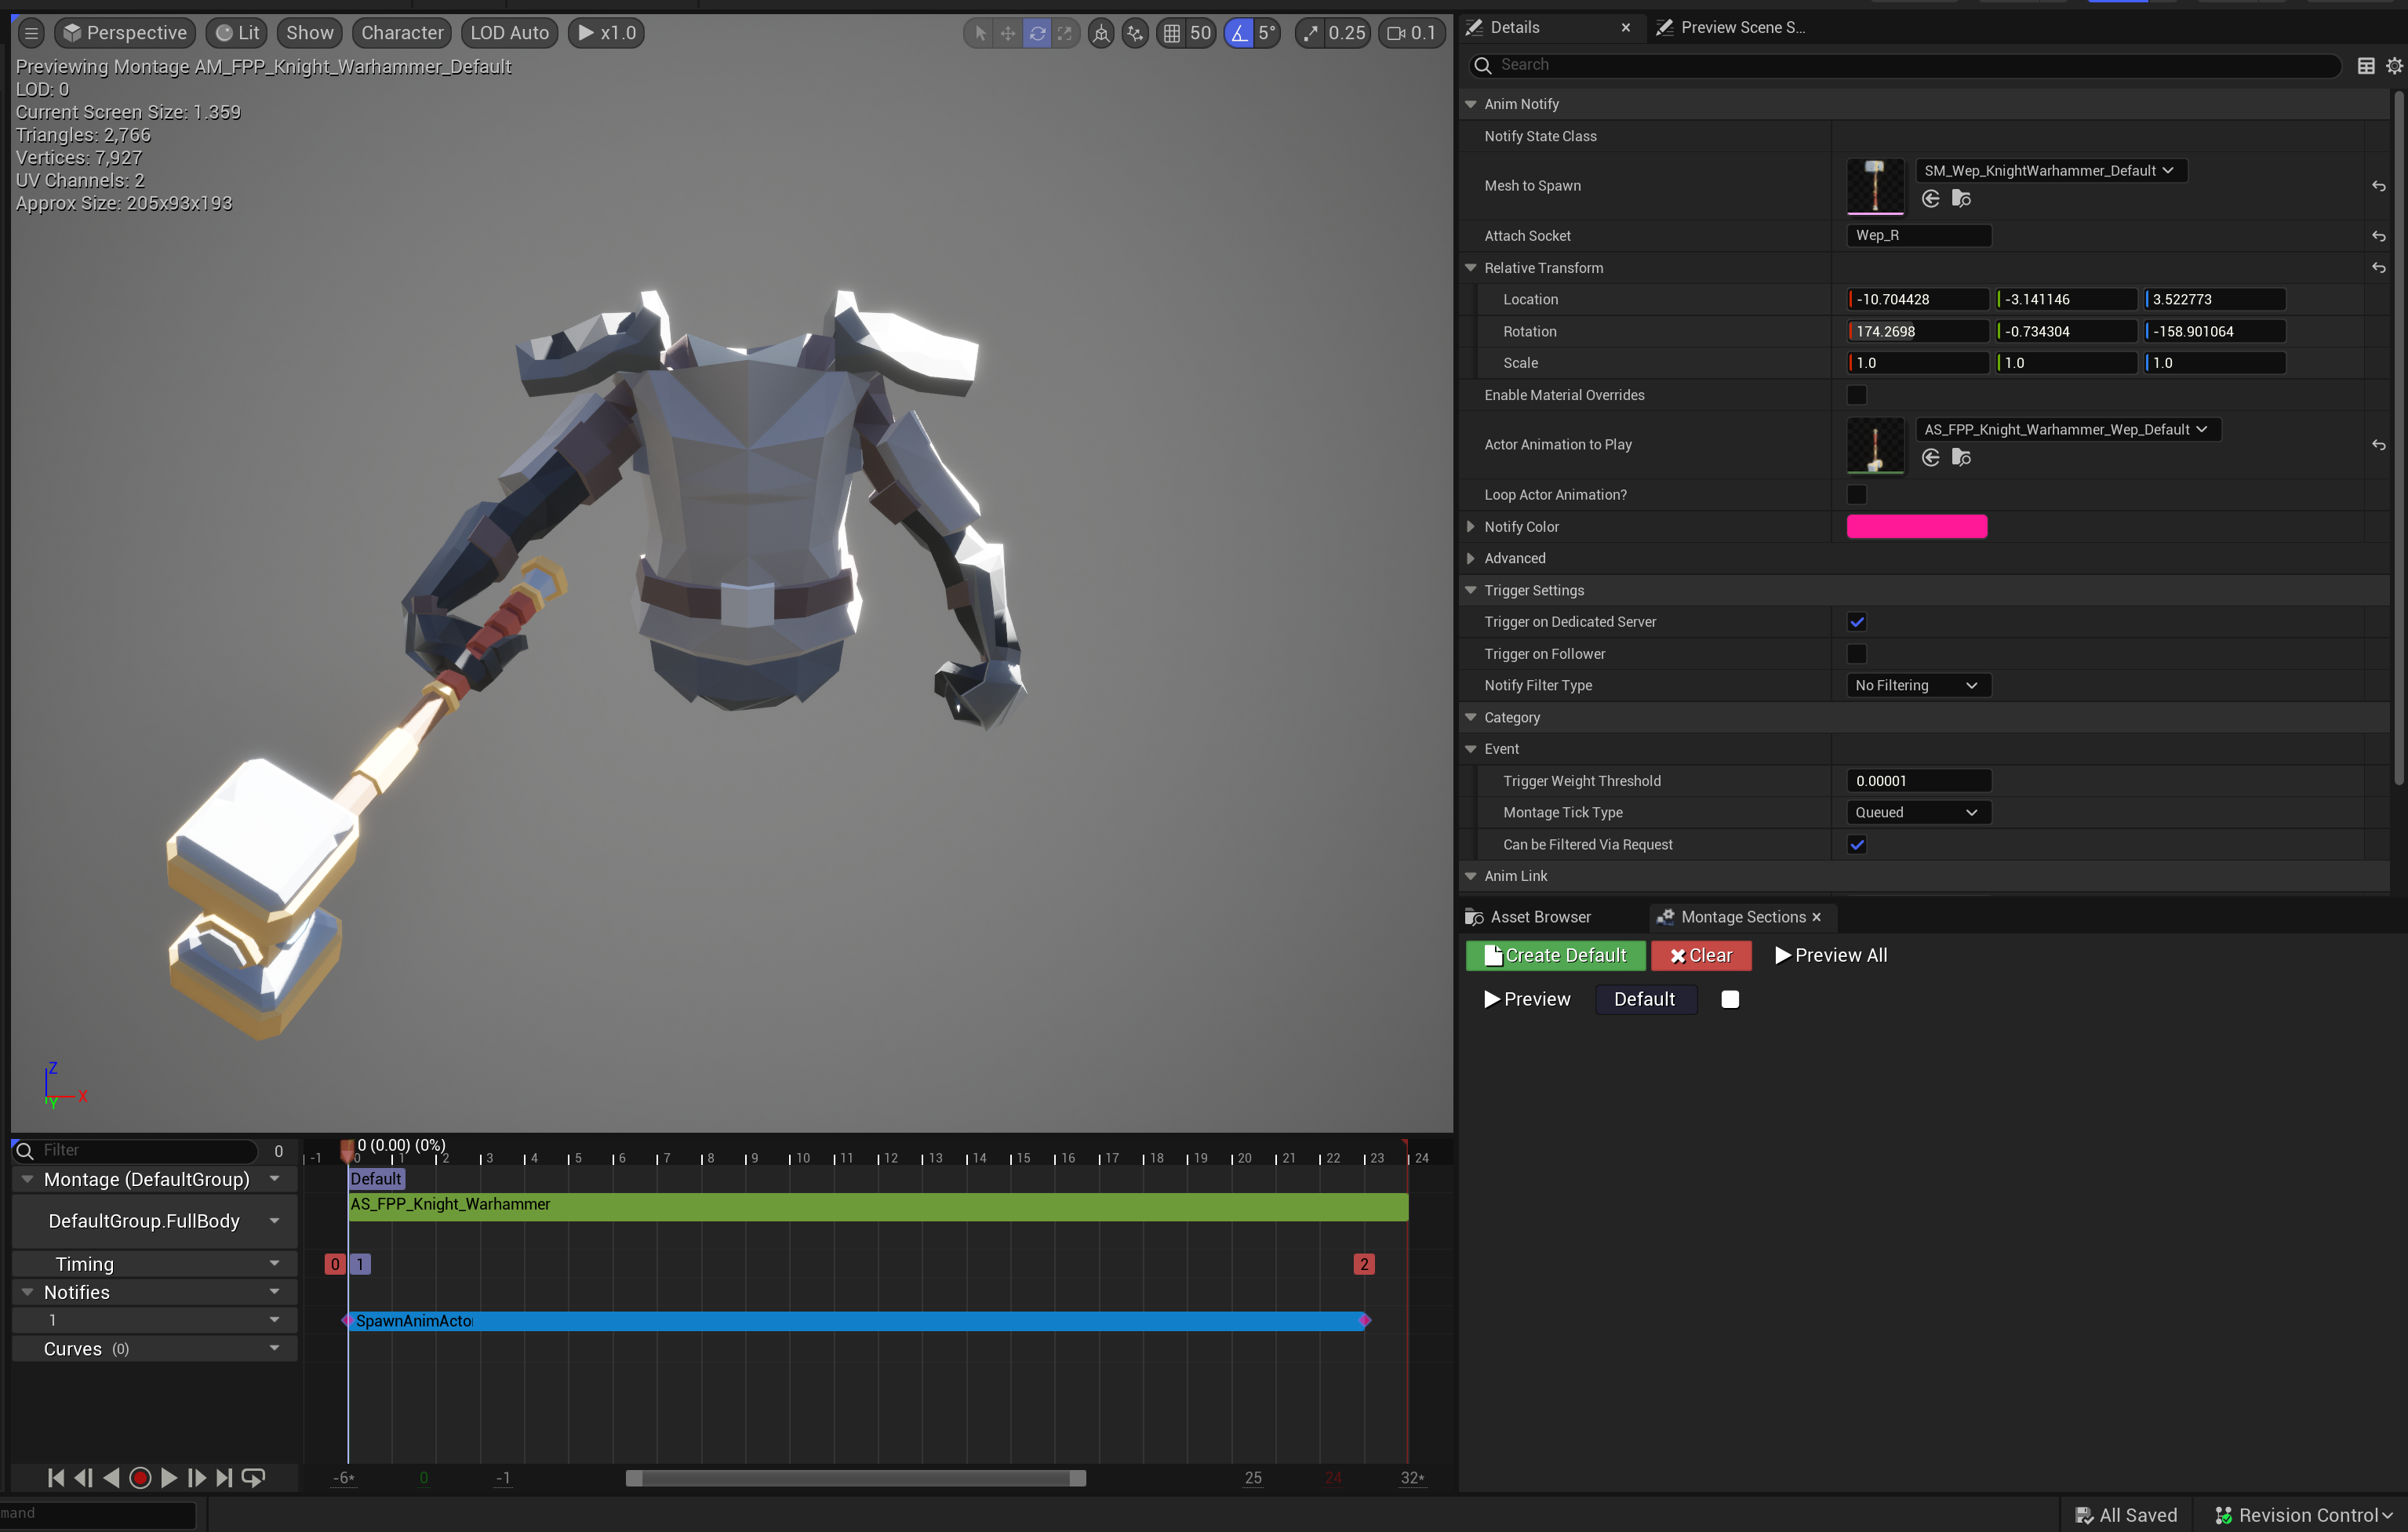
You’ll notice that once you start setting these properties, you’ll be able to see the animation actor appear inside the editor preview itself!
You may need to do some trial-and-error or refer to your animation file to find the desired values for Relative Transform. In a “real” game, weapon meshes like this would have their anchor point set such that simply attaching them to a character’s hand or weapon bone would place it in the correct position, without the need for this offset.
And just like that, we’re spawning a cosmetic actor in our animation! We can take this animation a step further with some simple particle effects, and end up with a result like this:
In Cloud Crashers, we use this notify everywhere, for both first- and third-person ability animations:
(Optional) Extra QoL Features
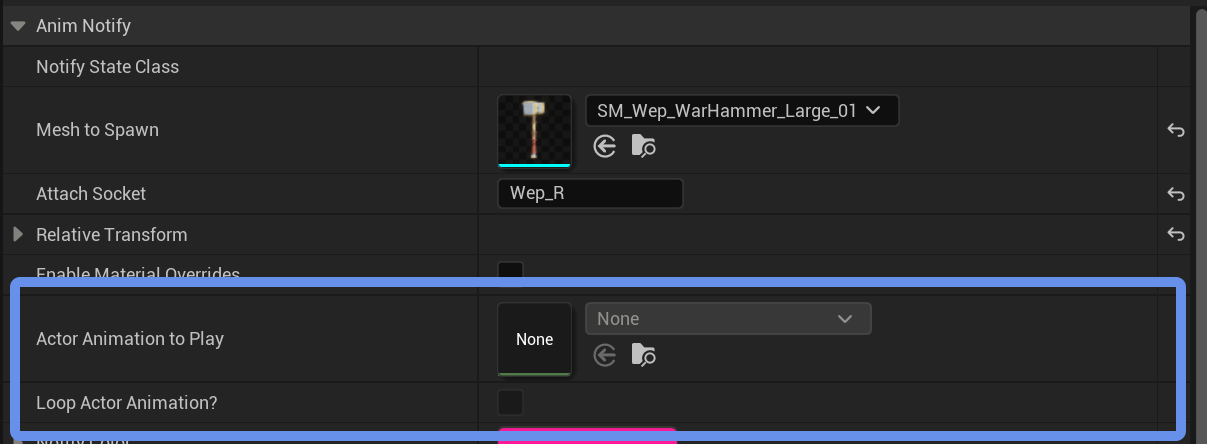
Restricting Property Editing
Another thing we do in Cloud Crashers is making sure users know they can’t play animations on a static mesh actor. We do this by disabling the notify’s animation properties if there isn’t a skeletal mesh isn’t selected.
To do this, we can implement the CanEditChange function which is used by the editor to determine whether a property can be changed:
#if WITH_EDITOR

public:

    // Hides animation properties if the selected mesh is not a skeletal mesh.
    virtual bool CanEditChange(const FProperty* InProperty) const override;

#endif // WITH_EDITOR
We wrap this function in a WITH_EDITOR macro because it’s only used in the editor; when we package our game, we don’t need this function anymore. WITH_EDITOR is a flag that gets set to false by the engine when compiling non-editor builds. This macro tells the compiler to ignore this function when WITH_EDITOR is false.
This function gets called for every property. In our implementation file, when we’re checking ActorAnimation and ActorAnimationLoops, we only want to let them be editable if our MeshToSpawn is a skeletal mesh. For every other property, we use the default Super implementation:
#if WITH_EDITOR
bool UAnimNotifyState_SpawnAnimActor::CanEditChange(const FProperty* InProperty) const
{
    bool bIsEditable = Super::CanEditChange(InProperty);

    if (bIsEditable && InProperty)
    {
        const FName PropertyName = InProperty->GetFName();

        /* Animation properties can't be edited unless this notify spawns a skeletal mesh (static meshes can't play
         * animations). */
        if (PropertyName == GET_MEMBER_NAME_CHECKED(UAnimNotifyState_SpawnAnimActor, ActorAnimation) ||
            PropertyName == GET_MEMBER_NAME_CHECKED(UAnimNotifyState_SpawnAnimActor, ActorAnimationLoops))
        {
            bIsEditable = IsValid(MeshToSpawn) && MeshToSpawn->IsA(USkeletalMesh::StaticClass());
        }
    }

    return bIsEditable;
}
#endif // WITH_EDITOR
Now, when we try edit our notify, we won’t be able to change any animation settings unless our selected mesh can actually use them!
Notify Names
One last thing we do in Cloud Crashers is override the notifies’ names in the editor.
You may have noticed that in our animation timeline, our notifies are all displayed as “SpawnAnimActor.” This isn’t super descriptive—especially when we have multiple notifies in one animation.
If we want our notifies to have a more helpful name, we can override the GetNotifyName_Implementation function, and instead of returning the name our class, we can return the name of the mesh we’re spawning:
// AnimNotifyState_SpawnAnimActor.h

public:

    // Uses the spawned mesh as this notify's name.
    virtual FString GetNotifyName_Implementation() const override;
// AnimNotifyState_SpawnAnimActor.cpp
FString UAnimNotifyState_SpawnAnimActor::GetNotifyName_Implementation() const
{
if (MeshToSpawn)
{
return ("Spawn " + GetNameSafe(MeshToSpawn));
}
else
{
return "Spawn Animation Actor (Unset)";
}
}Now, our notifies show their mesh’s name in the timeline!

Conclusion
When working on a massive project like a video game, compartmentalization is really important. The same way we’d want to keep all our character movement-related logic inside a character movement component, it’s nice to keep all our animation-related effects inside an animation asset.
Animation notifies are an incredibly powerful tool for creating complex animations. They allow us to write powerful modular scripts, compartmentalize our animation logic, and create useful tools for our animators.
Lastly, it’s important to keep in mind who will be using tools like this when programming them. Even if you’re the only person working on your project, it’s always great to have a nicer workflow!
I hope this article helped or taught you something new, and thanks for reading!