
Cone-Shaped Tracing
Learn to perform cone traces in Unreal Engine.
This is an in-depth explanation of and walkthrough to creating this function. If you just want the code, it can be found on Unreal Engine’s Learning site.
Introduction

If you’ve used Unreal Engine before, you may know that there are only four different trace shapes built into the engine: line, box, sphere, and capsule.
This is because traces, sweeps, and overlaps use a structure called FCollisionShape, which can only represent these four shapes. The reason why is tied to Unreal’s physics engine.
Important vocab! A “trace” is a raycast query that traces a line through the world. A “sweep” is a different type of query that moves a geometry object along a line. In other words, a “trace” is a trace with a line and a “sweep” is a trace with any other shape. In Unreal, this might be confusing because in the Kismet library, both of these queries are referred to as “traces.” Under the hood, however, these shape “traces” (e.g. UKismetSystemLibrary::SphereTraceSingle) are actually performing sweeps. We’ll really be making a “cone sweep” function, but we’ll still call it a “trace” to align with Unreal’s conventions.
PhysX (the physics engine used by Unreal until UE5), Chaos (Unreal’s current proprietary physics engine), and other physics engines support a collection of primitive geometry shapes. In both PhysX and Chaos, these are boxes, spheres, and capsules (PhysX also has planes).
Primitives are great because they can be represented with simple mathematics, and each have simple equations for testing intersections between them, raycasting against them, and sweeping them against each other.
This means that primitives are extremely efficient to compute compared to more complex shapes, which require more effort to process their vertices and triangles.
Even shapes that can be defined mathematically are much more computationally expensive. For example, you can test if two spheres are overlapping simply by comparing their distance and radii. But testing if two cones are overlapping is much more complex.
Additionally, a combination of boxes, spheres, and capsules can simulate just about any real-world object accurately enough for most use-cases: character collision is usually done with a single capsule; character ragdolls are usually a collection of capsules and spheres encompassing each limb; a cylinder can be simulated by intersecting a capsule with a box; etc.
When we do need more complex geometry, physics engines usually allow us to define our own geometry shapes as meshes, such as a convex mesh, by defining a collection of vertices, triangles, and/or faces that define the mesh, and then cooking that information into data that can be used to perform collision detection. But, again, this is more expensive than using primitive shapes.
You can actually have Unreal Engine do this for you, without having to manually define this data.
For all of these reasons, these three primitives are the only shapes supported by FCollisionShape (in addition to a simple raycast/line). But there may be times when none of these primitive shapes fits the needs of your project!
We can’t extend FCollisionShape, nor can we really perform queries with a convex mesh (they’re typically just used for physics assets). For complex shapes, our only real option is creating a mesh in the shape we want, spawning it in the world, making it invisible, and trying to detect what actors it overlaps.
Not only is this comparatively really expensive, but it can also be inaccurate if our mesh doesn’t have enough vertices—not to mention: overlaps (FOverlapResults) don’t provide nearly as much information as collision queries (FHitResults) do.
I mentioned earlier, however, that our primitive boxes, spheres, and capsules can be extremely versatile; there are actually a huge number of shapes that we can simulate just by using these primitives and a little math.
To see how, let’s learn how to make a pretty common shape: a cone! Cones can be an incredibly useful shape when programming gameplay: you can use them for melee attacks, flamethrowers, magical spells, or whatever other conical machinations you might have.
In this article, we’ll make a simple function to perform a cone-shaped sweep that is computationally efficient, accurate, and provides better data than a simple mesh overlap could.
Solution
Sphere Sweep
To perform a sweep in the shape of a cone, we’ll perform a sphere sweep encompassing an “imaginary” cone, and then use math to get rid of any hits that are inside that sphere, but would be outside of that cone.
Visually, our encompassing sphere sweep will look like this.

You can see how this initial sweep will essentially give us all the same results we would get from performing an actual cone-shaped sweep. The only difference is that, since the sphere sweep is bigger than the cone, we’ll end up with a few extraneous results that we’ll get rid of after.
Here’s a clearer look at what our sweep actually looks like, since, in practice, the distance between each sphere is incredibly small:

Let’s start with a signature for our function. I usually put this in a blueprint function library named something like UCollisionLibrary:
UFUNCTION(BlueprintCallable, Category = "Collision", Meta = (WorldContext = "WorldContextObject", AutoCreateRefTerm = "ActorsToIgnore", DisplayName = "Multi Cone Trace By Channel", AdvancedDisplay = "TraceColor, TraceHitColor, DrawTime", Keywords = "sweep"))
static bool ConeTraceMulti(const UObject* WorldContextObject, const FVector Start, const FRotator Direction, float ConeHeight, float ConeHalfAngle, ETraceTypeQuery TraceChannel, bool bTraceComplex, const TArray<AActor*>& ActorsToIgnore, EDrawDebugTrace::Type DrawDebugType, TArray<FHitResult>& OutHits, FLinearColor TraceColor = FLinearColor(0.0f, 1.0f, 1.0f), FLinearColor TraceHitColor = FLinearColor::Green, float DrawTime = 5.0f);
This function performs a multi-sweep using a collision channel. You could easily refactor this into a helper function to re-use it for a ConeTraceSingle function, and additional functions for TraceByProfile and TraceForObjects, like Unreal does for all of its built-in trace shapes.
The important parameters here are ConeHeight and ConeHalfAngle. I’m choosing to define the cone by these parameters because this is what designers usually care about: the range of the trace (the cone’s height) and the maximum angle of the trace (which is really the cone’s half-angle).
With these parameters, we can calculate the length and the radius of a sphere sweep that encompasses our cone:
bool UCollisionLibrary::ConeTraceMulti(
    const UObject* WorldContextObject,
    const FVector Start,
    const FRotator Direction,
    float ConeHeight,
    float ConeHalfAngle,
    ETraceTypeQuery TraceChannel,
    bool bTraceComplex,
    const TArray<AActor*>& ActorsToIgnore,
    EDrawDebugTrace::Type DrawDebugType,
    TArray<FHitResult>& OutHits,
    FLinearColor TraceColor,
    FLinearColor TraceHitColor,
    float DrawTime)
{
    OutHits.Reset();

    ECollisionChannel CollisionChannel = UEngineTypes::ConvertToCollisionChannel(TraceChannel);
    FCollisionQueryParams Params(SCENE_QUERY_STAT(ConeTraceMulti), bTraceComplex);
    Params.bReturnPhysicalMaterial = true;
    Params.AddIgnoredActors(ActorsToIgnore);

    UWorld* World = GEngine->GetWorldFromContextObject(WorldContextObject, EGetWorldErrorMode::LogAndReturnNull);
    if (!World)
    {
        return false;
    }

    TArray<FHitResult> TempHitResults;
    const FVector End = Start + (Direction.Vector() * ConeHeight);
    const double ConeHalfAngleRad = FMath::DegreesToRadians(ConeHalfAngle);
    // r = h * tan(theta / 2)
    const double ConeBaseRadius = ConeHeight * tan(ConeHalfAngleRad);
    const FCollisionShape SphereSweep = FCollisionShape::MakeSphere(ConeBaseRadius);

    // Perform a sweep encompassing an imaginary cone.
    World->SweepMultiByChannel(TempHitResults, Start, End, Direction.Quaternion(), CollisionChannel, SphereSweep, Params);
}
The distance of the sweep should be the height of the cone, which is given. The starting location and direction are given, so we can multiply that distance by the trace’s direction to get the point where the trace should end.
The radius of the sweep should be the radius of the base of the cone, so it can fully encompass the entire shape, but we didn’t make this a parameter.
A cone’s height, angle, and radius are all related, so it only takes two of these values to define it. I just mentioned that I chose to use the height and angle because it’s more intuitive to define a cone by these attributes. But since these values are tied together, we can calculate the radius we want:

Filtering
Now that we’ve generated a collection of hits from this sphere sweep, all we have to do is filter out extraneous results—that is, any results that were inside our sphere sweep, but would be outside our imaginary cone.
There are two situations where this can occur…
- A hit is outside the angle of the cone:

- A hit is beyond the cone, within the ending cap of the sphere sweep:

Fortunately, we can account for both of these pretty easily with a few calculations:
    // ...

    // Filter for hits that would be inside the cone.
    for (FHitResult& HitResult : TempHitResults)
    {
        const FVector HitDirection = (HitResult.ImpactPoint - Start).GetSafeNormal();
        const double Dot = FVector::DotProduct(Direction.Vector(), HitDirection);
        // theta = arccos((A • B) / (|A|*|B|)). |A|*|B| = 1 because A and B are unit vectors.
        const double DeltaAngle = FMath::Acos(Dot);

        // Hit is outside the angle of the cone.
        if (DeltaAngle > ConeHalfAngleRad)
        {
            continue;
        }

        const double Distance = (HitResult.ImpactPoint - Start).Length();
        // Hypotenuse = adjacent / cos(theta)
        const double LengthAtAngle = ConeHeight / cos(DeltaAngle);

        // Hit is beyond the cone. This can happen because we sweep with spheres, which results in a cap at the end of the sweep.
        if (Distance > LengthAtAngle)
        {
            continue;
        }

        OutHits.Add(HitResult);
    }

    return (OutHits.Num() > 0);
}
To determine whether a hit is outside the angle of our cone, we can calculate the angle of the hit, and check if it’s greater than our cone’s angle. We can do that with the following formula:
\[{θ} = \arccos{\frac{ {A} \dotproduct {B} }{\|{A}\| \cdot \|{B}\|}}\]It might be hard to tell in LaTeX: the top equation is a dot product; the bottom is a multiplication.
In this equation, \({A}\) and \({B}\) are both normal vectors; \({A}\) is the direction of the center of our cone, and \({B}\) is the direction of the hit. This equation gives us the angle between them. Since both directions are normalized, the denominator equates to 1.0, so we ignore it in our code.
To determine if our hit is beyond the cone, we have to check the length of our hit. If that length is greater than the length of our cone, then we know it’s too far.
The cone’s height represents the maximum distance a hit can be at the center of the cone. But this distance changes with the angle:

To calculate this distance, \({s}\), at any angle, we can use this equation:
\[{s} = \frac{h}{\cos{θ}}\]If you remember high school geometry class, this is the CAH in SOH CAH TOA: \(\cos{(θ)} = \frac{adjacent}{hypotenuse}\)
If the length of the trace is greater than this distance (which we named LengthAtAngle), we’ll filter it out.
Now, with our filtering done, our function is complete! We’ve performed a trace encompassing our cone, and removed any results that go outside of it.
Debugging
One last thing we should do is add some optional debug draws. Fortunately, Unreal already has an arsenal of debug functions we can use. We’ll put this right before our return statement:
    // ...

#if ENABLE_DRAW_DEBUG
    if (DrawDebugType != EDrawDebugTrace::None)
    {
        // Cone trace.
        const double ConeSlantHeight = FMath::Sqrt((ConeBaseRadius * ConeBaseRadius) + (ConeHeight * ConeHeight)); // s = sqrt(r^2 + h^2)
        DrawDebugCone(World, Start, Direction.Vector(), ConeSlantHeight, ConeHalfAngleRad, ConeHalfAngleRad, 32, TraceColor.ToFColor(true), (DrawDebugType == EDrawDebugTrace::Persistent), DrawTime);

        // Uncomment to see the trace we're actually performing.
        // DrawDebugSweptSphere(World, Start, End, ConeBaseRadius, TraceColor.ToFColor(true), (DrawDebugType == EDrawDebugTrace::Persistent), DrawTime);

        // Successful hits.
        for (const FHitResult& Hit : OutHits)
        {
            DrawDebugLineTraceSingle(World, Hit.TraceStart, Hit.ImpactPoint, DrawDebugType, true, Hit, TraceHitColor, TraceHitColor, DrawTime);
        }

        // Uncomment to see hits from the sphere sweep that were filtered out.
        // for (const FHitResult& Hit : TempHitResults)
        // {
        //     if (!OutHits.ContainsByPredicate([Hit](const FHitResult& Other)
        //     {
        //         return (Hit.GetActor() == Other.GetActor()) &&
        //                (Hit.ImpactPoint == Other.ImpactPoint) &&
        //                (Hit.ImpactNormal == Other.ImpactNormal);
        //     }))
        //     {
        //         DrawDebugLineTraceSingle(World, Hit.TraceStart, Hit.ImpactPoint, DrawDebugType, false, Hit, FColor::Red, FColor::Red, DrawTime);
        //     }
        // }
    }
#endif // ENABLE_DRAW_DEBUG
Final Result
With debugging enabled, we can finally see what our trace looks like:

Here’s a more complex usage, that also shows the hits we’ve filtered out in red:
If you’ve followed along up to here, your results probably won’t look like this; read the next section to learn why!
Tips for Use
Hitting Multiple Actors
With a normal trace, the trace usually stops once it hits the first component that has its collision channel set to Block. But in most situations where you’d want to use a cone-shaped trace (e.g. swinging a large, sweeping sword), you want to hit all actors within the cone.
With Unreal Engine’s default collision configuration, you won’t be able to do this, because character meshes and collision capsules use Block as their default response to the Camera channel, and completely ignore the Visibility channel.
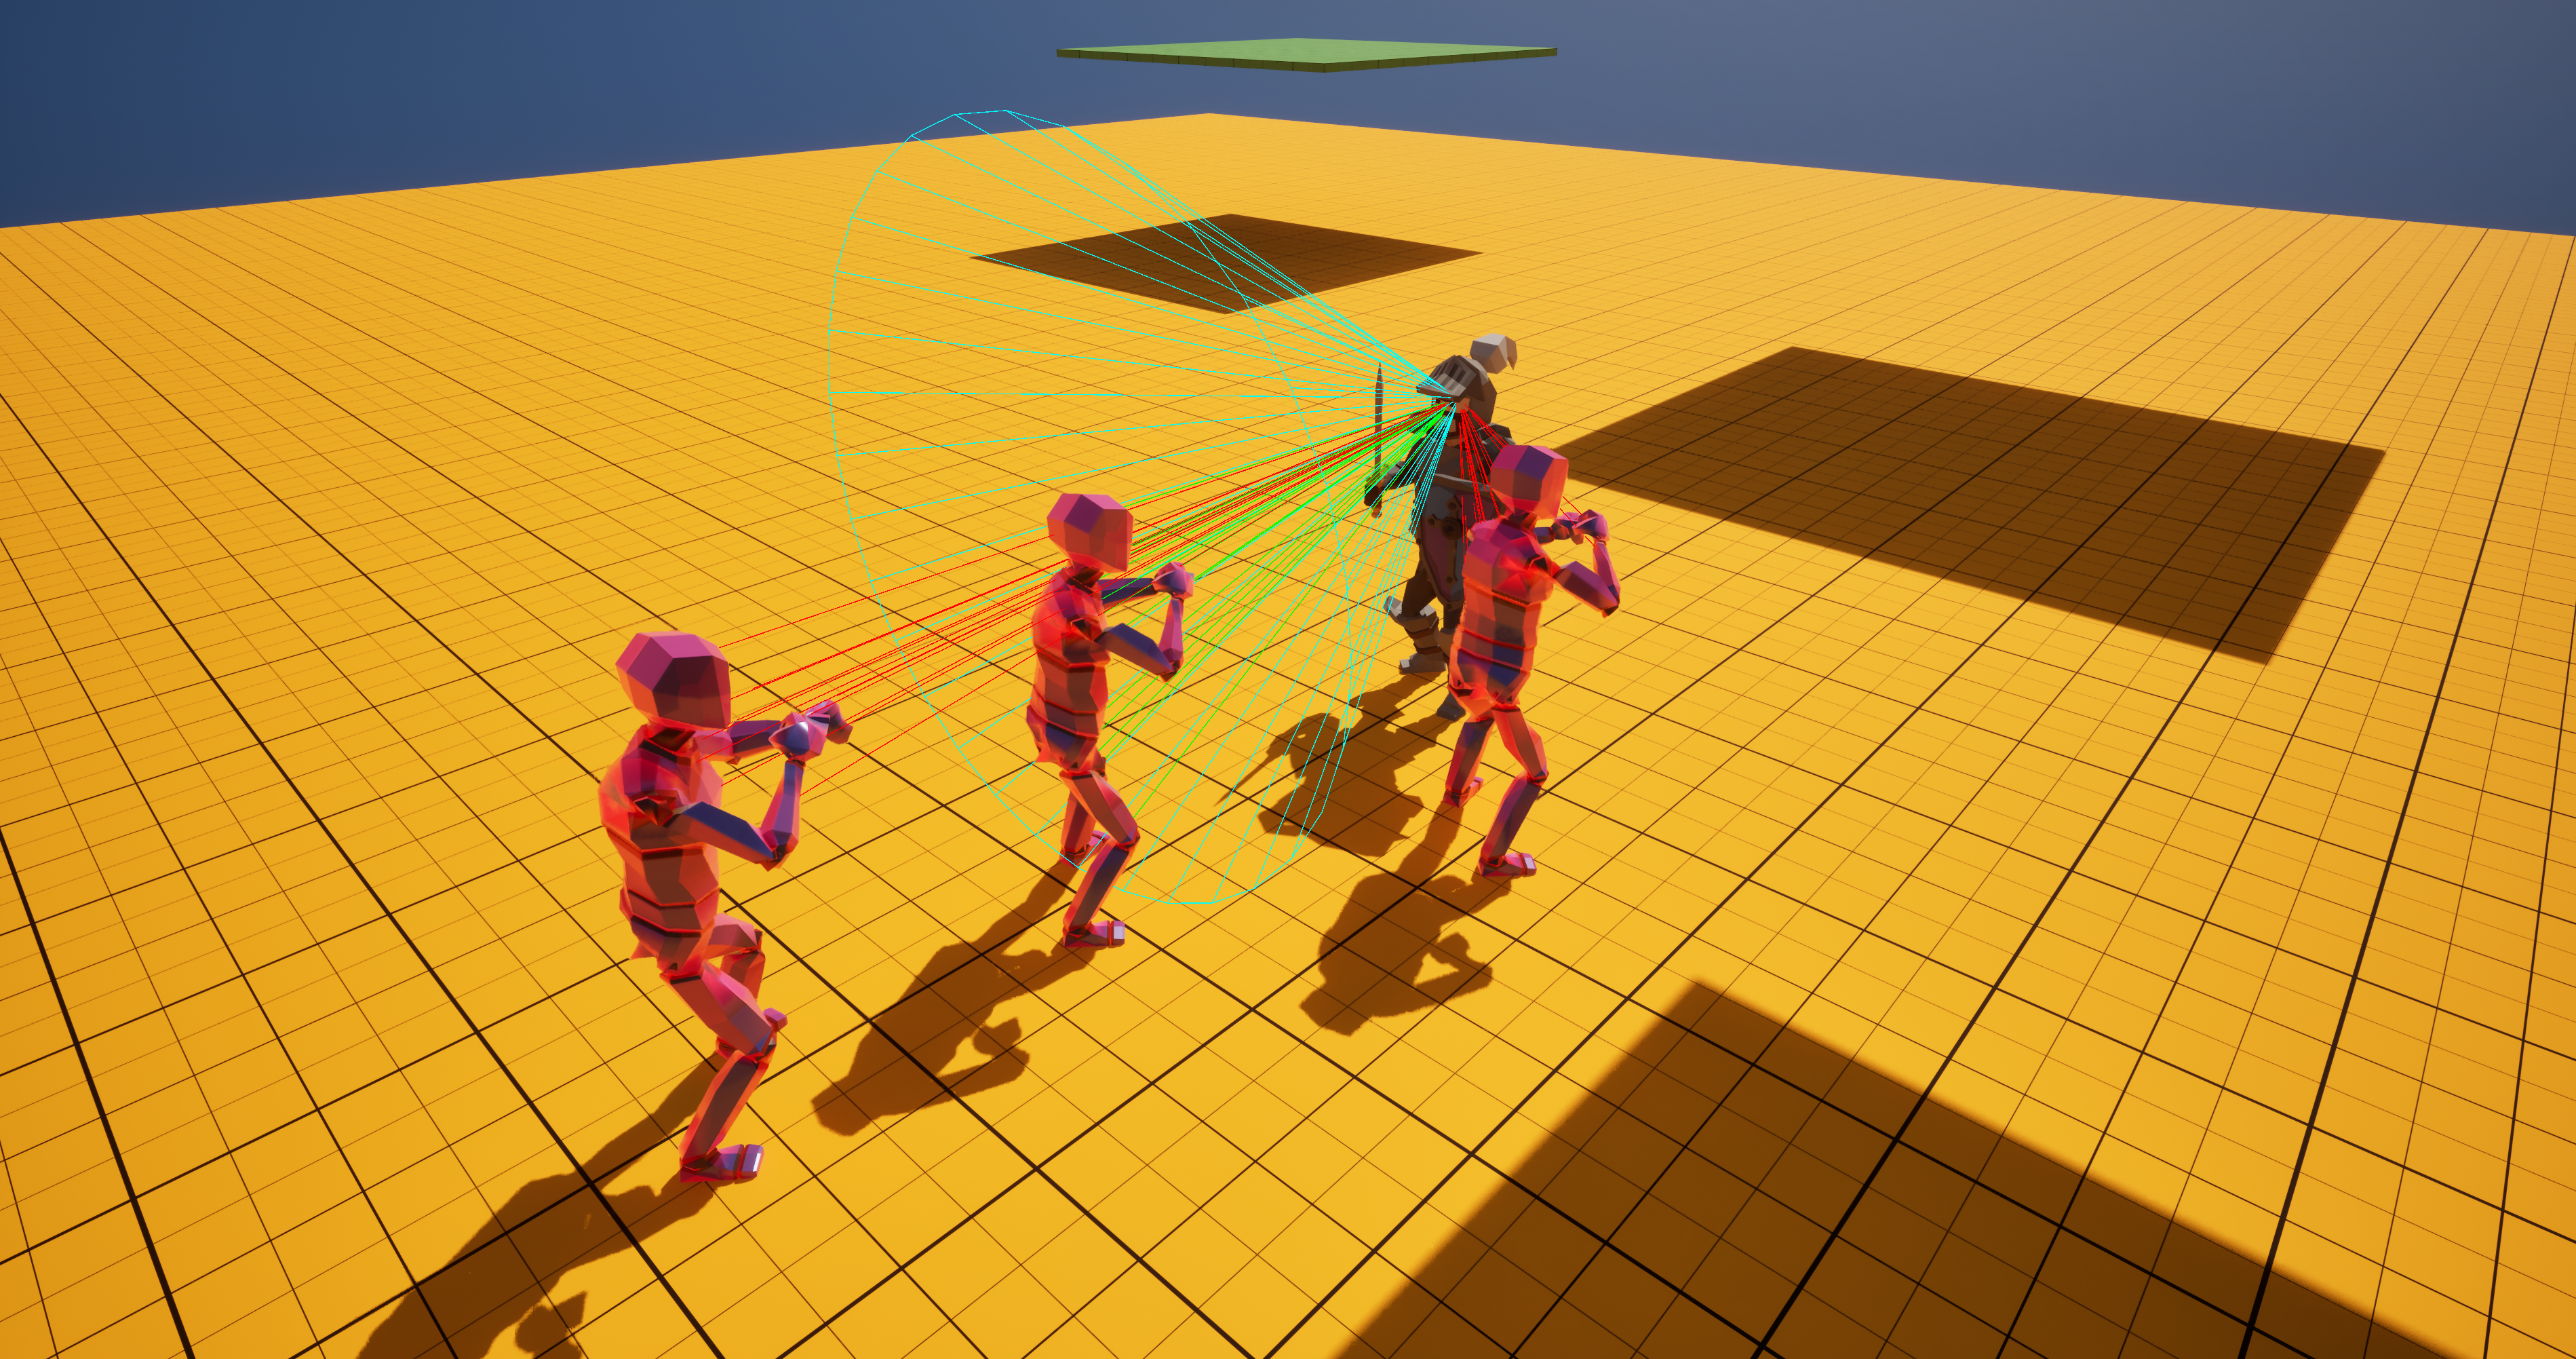
If you want this trace to hit every actor in the cone, as it does in the images above, there are two (good) ways to do so:
- Change the sweep’s default response to
Overlap. This allows the sweep to pass through any objects it hits, so it doesn’t become blocked by the first one. To do this, change theSweepMultiByChannelfunction call to this:
FCollisionResponseParams ResponseParams(ECR_Overlap);
World->SweepMultiByChannel(TempHitResults, Start, End, Direction.Quaternion(), CollisionChannel, SphereSweep, Params, ResponseParams);-
Create a new custom trace channel to use when tracing attacks and abilities. For larger, more complex games, this is the preferred choice, since you’re probably doing this already. It gives you greater control over which abilities can hit which parts of different actors.
In the above images, I’m performing the trace with a channel called
AbilityTarget_Multi. Character meshes and collision capsules respond to this channel withOverlap, while everything else ignores it. This allows the trace to hit all characters within the cone without being blocked.
Selecting Hits
When using the above setup, you’ll likely receive more than one hit for each character; this can actually be really useful!
If, for example, you’re performing a sword attack that has a large radius, you’ll likely hit your target in multiple places with each swing. But, for the player, it would make the most sense if their hit aligned with their camera.
For example, here’s what a sword attack could look like if we simply use the first hit we receive:
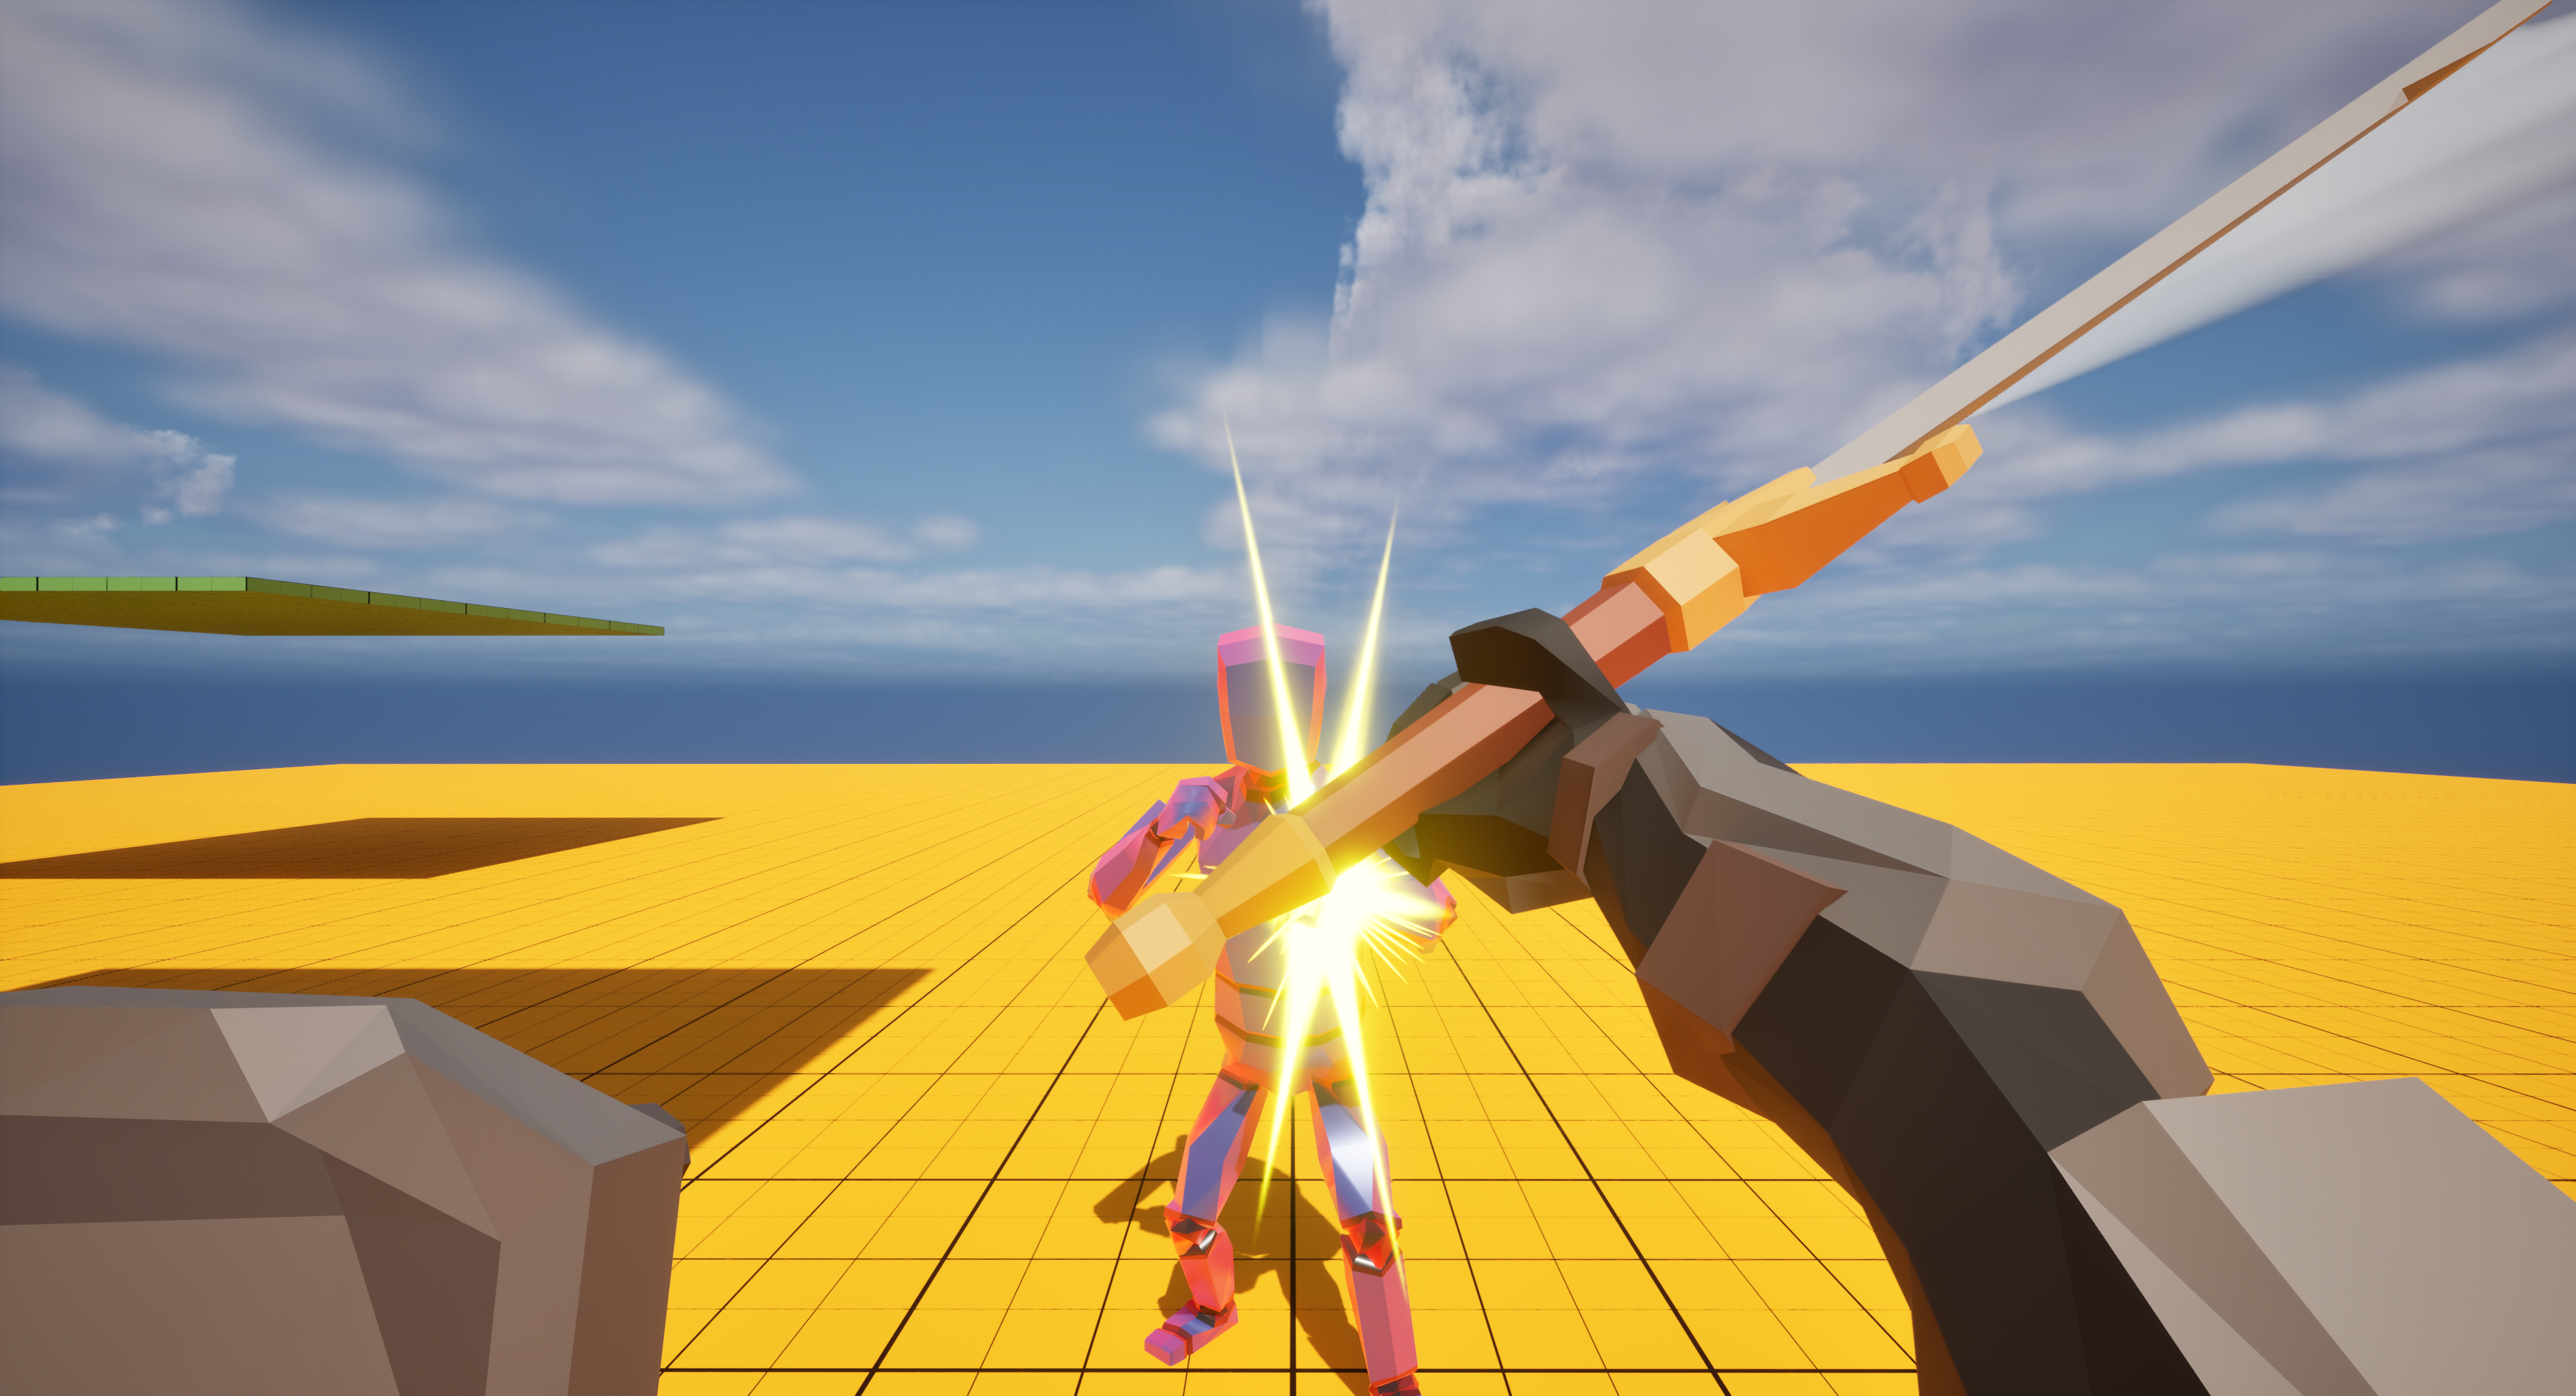
But if we take all of our cone trace’s hits, search through them, and select the one closest to our player’s camera, we’ll get this:

This may seem like a small change, but it has a real impact on our players’ quality-of-life!
Trace vs. Overlap
The idea of using a trace to detect any actors within the shape may sound counterintuitive; wouldn’t it make more sense to perform an overlap instead?
Unfortunately, it’s not possible to perform a cone-shaped overlap efficiently. This is because an overlap (i.e. if we did a capsule overlap instead of a sphere sweep) returns an FOverlapResult structure, which tells us which components were overlapped, but not where they were overlapped.
Because overlaps don’t tell us the direction or location of where they occurred, we can’t determine whether an overlap would be outside the angle of the cone.
Even if we could perform a cone-shaped overlap (e.g. defining our own convex mesh geometry or simply using a cone-shaped mesh), the lack of information regarding how that overlap occurred is inadequate for most use cases. For example, we would have no idea where to place the particle effects in the images above.
Performance
I mentioned that this trace method was computationally efficient. Let’s do some profiling to see exactly how performant it is.
I use this trace function in my melee attacks, which perform a trace 30 times per second while the ability’s hitbox is active. This is an Unreal Insights trace (confusing name, I know) showing what one of these traces look like:

Here, you’ll see that a single execution of this cone trace was performed in about 7.4 µs, which is 7.4 millionths of a second. Over a few tests, I found that it averages about 7-10 µs.
When running a game at 60 fps (which should hopefully be the low end for most games), you’ll have a total of 16,666 µs (on each thread) to do work; 7-10 µs for a gameplay-critical function is completely reasonable, and won’t be causing any bottlenecks. You can even see that this function only comprised 0.07% of the amount of work the game thread did this frame.
Just for fun, let’s compare this to the alternative approach above: performing an overlap with a mesh.
I quickly mocked up a similar function that, instead of performing a sphere trace, performs an overlap query with a cone-shaped mesh. And, to simulate a real use-case, this function also performs a line trace to each overlap, since the overlap result alone doesn’t give us all the data we want. Lastly, to be completely fair, I optimized the function a bit by only spawning one cone mesh and re-using it for each query, so the overhead of spawning the mesh itself can be skipped.
Replacing our cone trace function with this new ConeOverlap function, our trace looks like this:

Yikes. On average, I found this function to take between 70-170 µs (150-300 µs inclusive time), taking up around 2% of our game thread’s total work. Compared to our original function, that’s upwards of 10-20 times slower! That is an insane difference. Not to mention the fact that even with the line traces I mentioned, the data this method acquires is still far from optimal, and would likely require additional work to make usable.
Conclusion
Don’t let your gameplay design be limited by the tools at your disposal, when you can always make your own. With a little creativity (and math), you can bring any idea to life.
I hope this article helped you out, showed you how you can simulate different query shapes, and gave you some ideas for devising creative solutions to gameplay going forward.