Procedural First-Person Animation System
A walkthrough to creating a robust, procedural first-person animation framework, inspired by games like Overwatch.
This is an in-depth walkthrough to creating this animation system. If you just want the code, it can be found on Unreal Engine’s Learning site. But note that this tutorial also shows how to set up the animation blueprint, which isn’t included on the UE Learning post.
Introduction

I’m currently working on a hero-based fighting game called Cloud Crashers. In this game, each playable character has a unique weapon, set of abilities, and overall aesthetic that feels distinct.
When designing the first-person animation system, I needed a robust framework that could streamline building large numbers of complex animation sets (since I’m animating everything myself). But I also wanted a way to make each character feel unique, with their own sense of personality.
As I was researching solutions for animation frameworks, I came across this brilliant GDC talk by Blizzard Entertainment’s Matt Boehm:
In this presentation, Matt breaks down how Overwatch uses animation layers, additives, and spring models—among other tricks—to convey each hero’s unique personality through procedural first-person animations.
This isn’t a technical talk (nor does Overwatch use Unreal Engine), but it gave me some insights on how to use these techniques to build a similar system in Unreal Engine.
In this article, I’ll show how to implement a flexible first-person animation system from scratch. By the end, we’ll have an extremely powerful animation blueprint which can be used to create robust animation sets like this:
In Cloud Crashers, we actually use two animation instance classes: a base class and a first-person subclass. This is because Cloud Crashers also supports third-person, and the third-person class re-uses a lot of the data in the base animation instance class. For the sake of simplicity, in this tutorial, I’ve rewritten the base class and first-person class into one class.
Base Pose
Creating an Animation Instance Class
Let’s start by creating a new C++ class called FirstPersonCharacterAnimInstance. This will be a subclass of Unreal’s AnimInstance class, and will serve as the base class for our animation blueprint.
We’ll be collecting a lot of data, and performing a lot of calculations for our character. Doing this in a C++ class will be a lot easier, and will help keep our animation blueprint clean. We’ll cache all of our data so our animators (us) have access to it in the animation graph.
In our constructor, let’s enable multithreading to avoid bottlenecks when animating multiple characters.
// FirstPersonCharacterAnimInstance.h

UCLASS(Abstract)
class GAME_API UFirstPersonCharacterAnimInstance : public UAnimInstance
{
    GENERATED_BODY()

public:

    UFirstPersonCharacterAnimInstance();
};
// FirstPersonCharacterAnimInstance.cpp
UFirstPersonCharacterAnimInstance::UFirstPersonCharacterAnimInstance()
{
bUseMultiThreadedAnimationUpdate = true;
}Remember to replace GAME_API with your game’s API name. Unreal does this automatically if you use the “New C++ Class…” option.
Locomotion Blend Space and State Machine
Like Matt says, we need to start with a base pose for our character. Then, we’ll play our animations on top of that (we’ll use Unreal Engine’s animation slots instead of Maya Layers), and apply additive poses on top of the resulting animation.
To get the base pose, we’re going to use a simple locomotion blend space. First-person locomotion animations are significantly less complex than third-person: we don’t need to account for turns or bother with state machines; we just need to blend between an Idle animation and a Walking animation.
Let’s create a new animation blueprint based on our animation instance class, and start by playing a blend space. Since we want to re-use this animation blueprint with each character, we’ll create a new Idle/Walk BS blend space variable and bind it to the player.
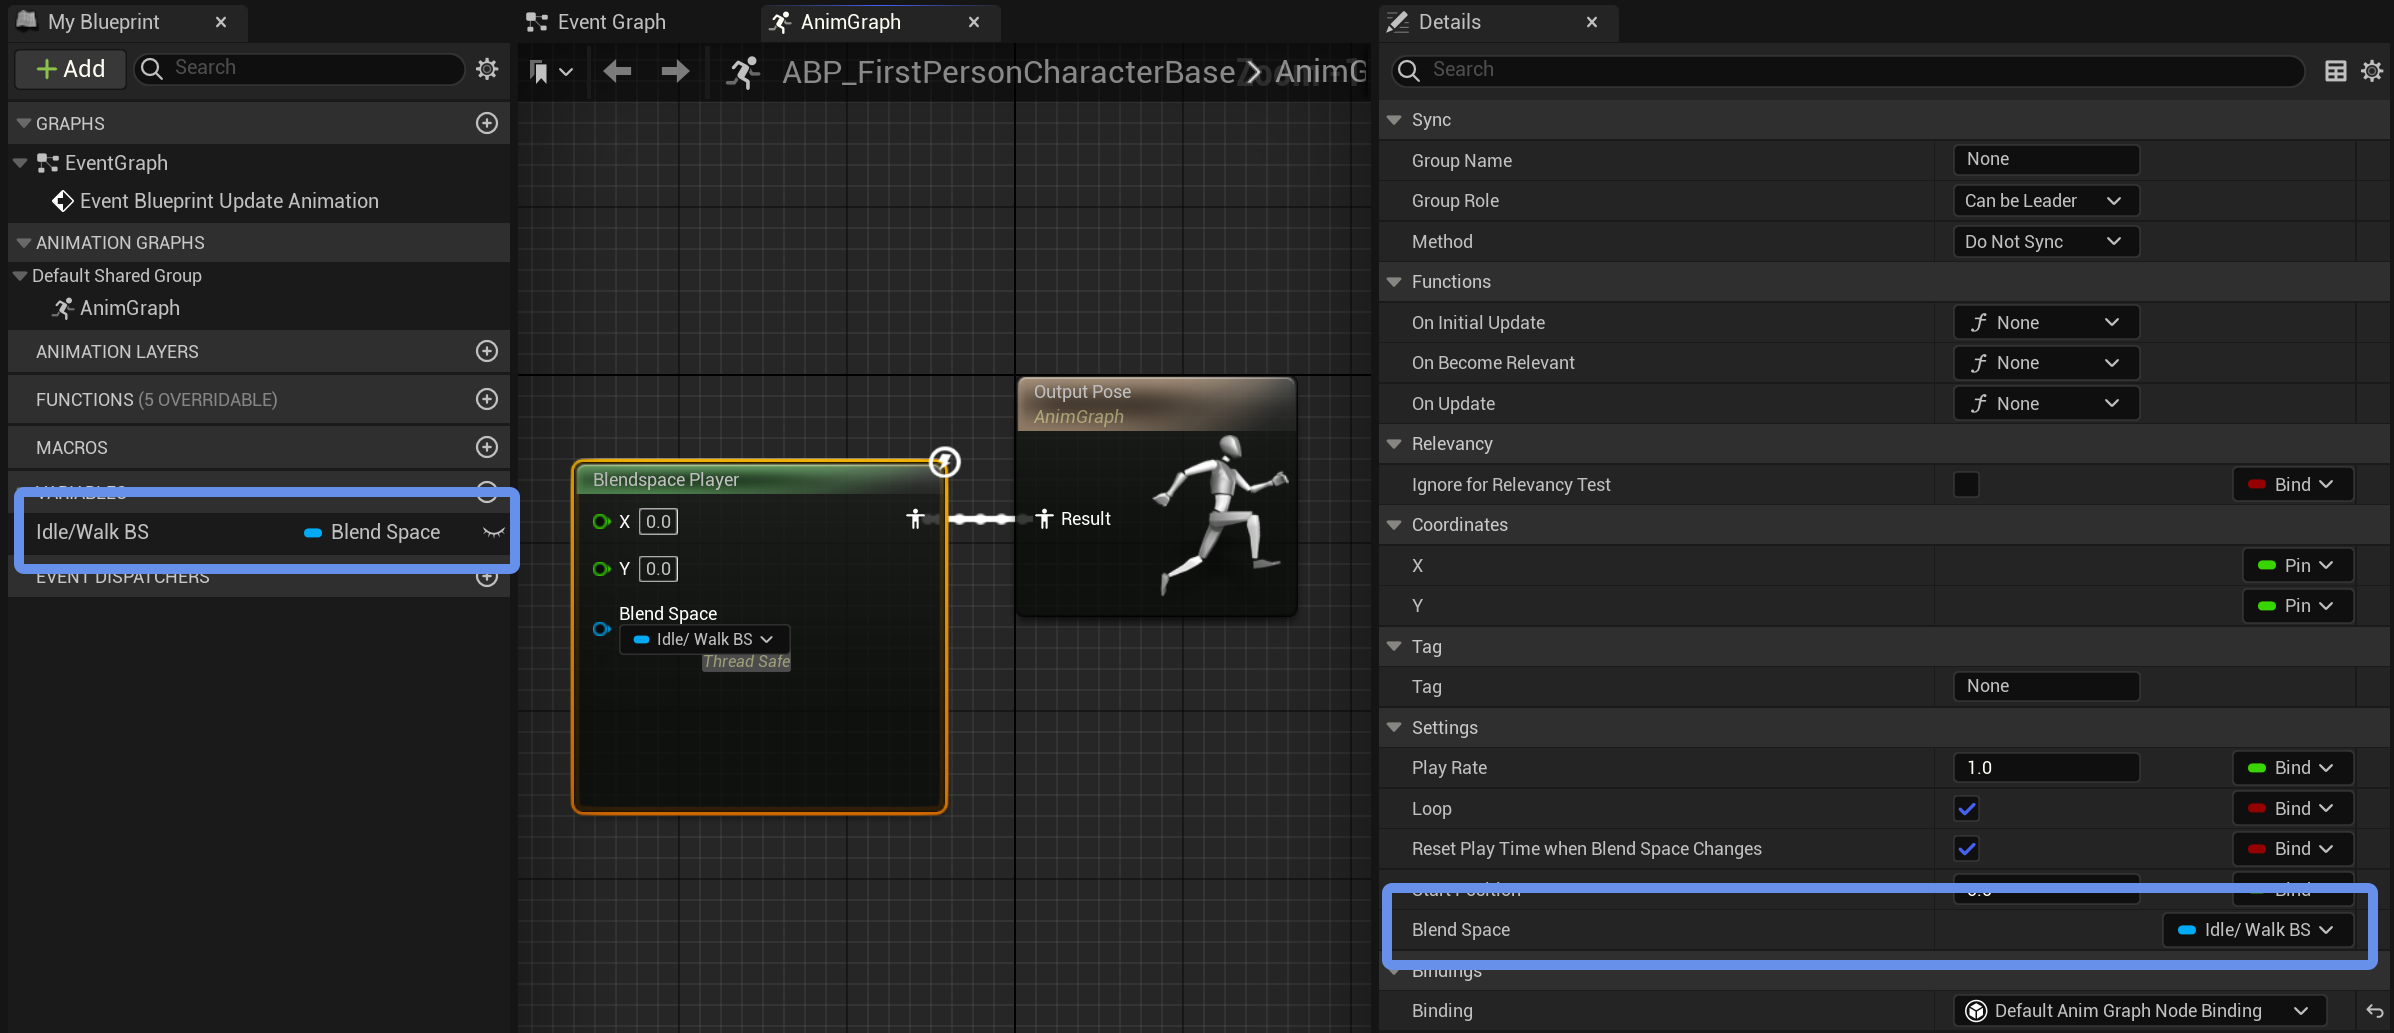
This is how we’ll define all of our animation assets. This way, to make each character’s animation blueprint, all we have to do is subclass this animation blueprint and set each variable to use that character’s unique animation assets and settings.
This blend space will work perfectly for our grounded movement, but we also need to account for when we jump or fall. So, before we go any further, let’s create a new state machine that will switch between our grounded and airborne locomotion:
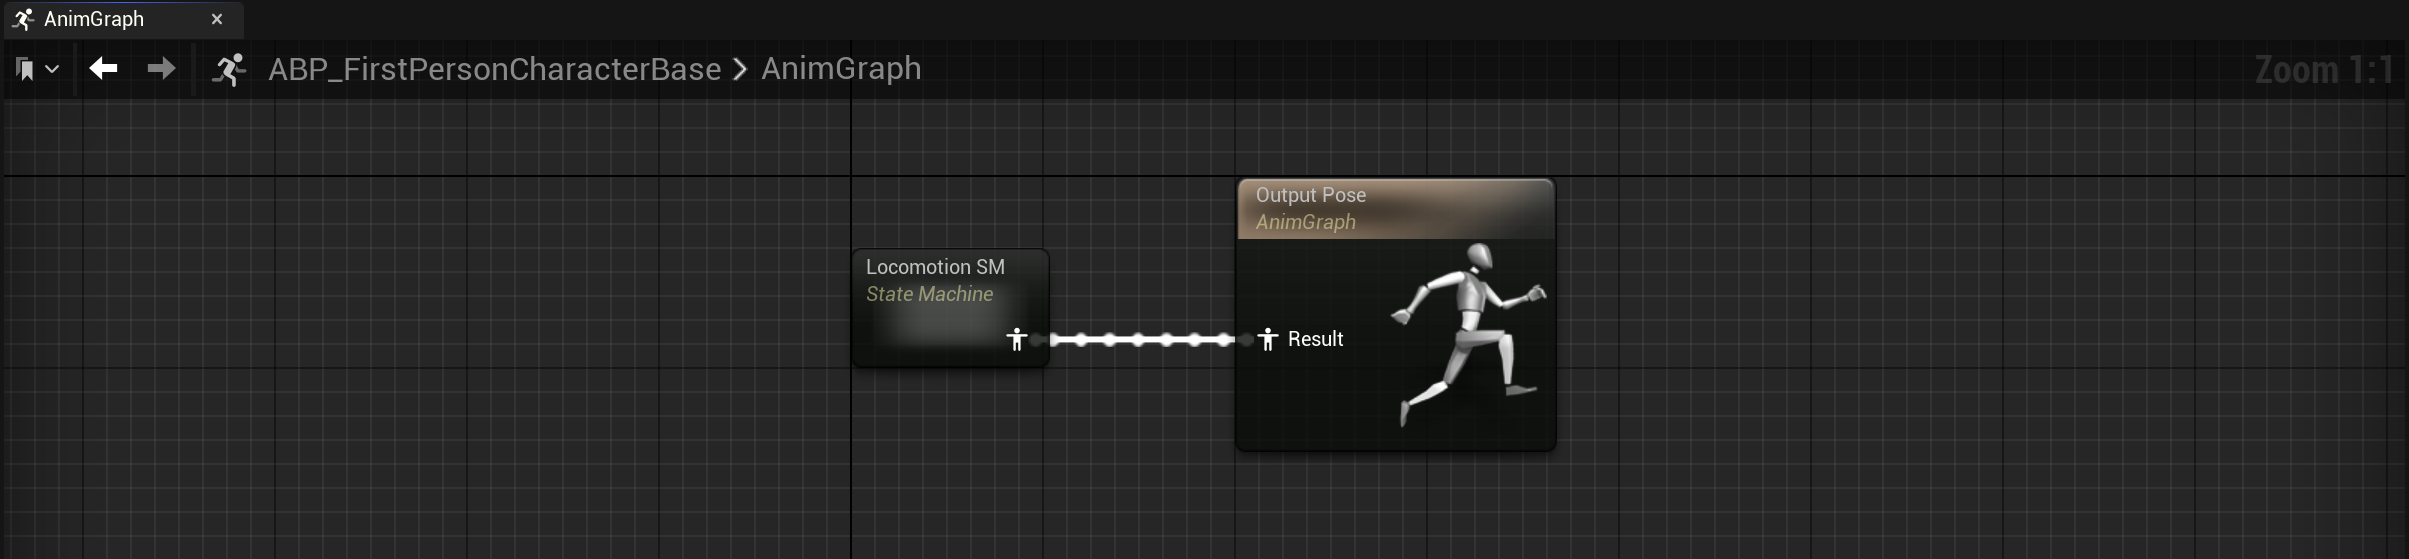
Inside, we only need two states: one for when we’re on the ground and one for when we’re in the air. For the grounded state, we’ll use the blend space we just created (you can just copy/paste it).
For our airborne state, we’ll simply loop a new Falling animation sequence, which we can bind to a new variable (in Cloud Crashers, we just re-use the idle animation):


State machines for jumping are usually extremely complex, in order to account for each state of the jump (Jump, Falling Up, Apex, etc.). But we’re actually going to create our jump animations procedurally with our additives later, so we just need this one state.
Next, we’ll calculate the parameters we need to drive our blend space and transition between our locomotion states.
Calculating Velocity Data
To blend the animations in our blend space, we need our character’s speed. Specifically, because we’re using a 2D blend space that can define animations for walking in each direction, we want to know how fast the character is moving forwards or backwards, and right or left.
Cloud Crashers uses the same walking animation regardless of the direction the character is moving, but we have the option to use directional animations. Either way, we’ll need these variables to calculate our additives later.
To get these values, we want to calculate the character’s velocity along their local x-axis (forward/backward) and local y-axis (right/left).
In our animation instance, let’s define some variables in our header file:
protected:

	// This character's current velocity, relative to its world rotation.
	UPROPERTY(BlueprintReadOnly, Category = "Velocity Data")
	FVector LocalVelocity;

	// This character's current local velocity with vertical velocity (Z) masked out.
	UPROPERTY(BlueprintReadOnly, Category = "Velocity Data")
	FVector LocalVelocity2D;

	/* This character's current local velocity, normalized to its maximum movement speed. Vertical velocity (Z) is
	 * masked out. */
	UPROPERTY(BlueprintReadOnly, Category = "Velocity Data")
	FVector LocalVelocity2DNormalized;
We want to update these variables (and most of the variables we’ll use) every frame. To do this with multithreading, we implement the NativeThreadSafeUpdateAnimation function:
public:

	virtual void NativeThreadSafeUpdateAnimation(float DeltaSeconds) override;
Now, in our implementation (.cpp) file, we’ll start with a couple checks to make sure we have what we need to calculate these variables. To normalize our velocity to our maximum speed, we need our character movement component. So let’s make sure we have one:
void UFirstPersonCharacterAnimInstance::NativeThreadSafeUpdateAnimation(float DeltaSeconds)
{
    Super::NativeThreadSafeUpdateAnimation(DeltaSeconds);

	APawn* PawnOwner = TryGetPawnOwner();
	if (!PawnOwner)
	{
		return;
	}

	UCharacterMovementComponent* CharMovementComp = Cast<UCharacterMovementComponent>(PawnOwner->GetMovementComponent());
	if (!CharMovementComp || (CharMovementComp->MovementMode == MOVE_None))
	{
		return;
	}

	// ...
}
We’ll be calculating a lot of variables; I don’t want to put them all into NativeThreadSafeUpdateAnimation. Instead, we’ll separate them into different functions. To update our velocity variables, let’s create a new function called UpdateVelocityData. Inside, we’ll calculate our character’s local velocity, normalize with their maximum movement speed:
protected:

	// Calculate velocity data this frame.
	void UpdateVelocityData();
void UFirstPersonCharacterAnimInstance::NativeThreadSafeUpdateAnimation(float DeltaSeconds)
{
// ...
UpdateVelocityData();
}void UFirstPersonCharacterAnimInstance::UpdateVelocityData()
{
APawn* PawnOwner = TryGetPawnOwner();
UCharacterMovementComponent* CharMovementComp = Cast<UCharacterMovementComponent>(PawnOwner->GetMovementComponent());
const FVector WorldVelocity = PawnOwner->GetVelocity();
const FRotator WorldRotation = PawnOwner->GetActorRotation();
// The character's "local" velocity is their world velocity relative to their world rotation.
LocalVelocity = WorldRotation.UnrotateVector(WorldVelocity);
LocalVelocity2D = LocalVelocity * FVector(1.0f, 1.0f, 0.0f);
// Normalize the character's local velocity to their maximum movement speed.
const float MaxMovementSpeed = CharMovementComp->GetMaxSpeed();
const float NormalizedX = FMath::Clamp(UKismetMathLibrary::NormalizeToRange(LocalVelocity2D.X, 0.0f, MaxMovementSpeed), -1.0f, 1.0f);
const float NormalizedY = FMath::Clamp(UKismetMathLibrary::NormalizeToRange(LocalVelocity2D.Y, 0.0f, MaxMovementSpeed), -1.0f, 1.0f);
LocalVelocity2DNormalized = FVector(NormalizedX, NormalizedY, 0.0f);
}Back in our animation blueprint, we can bind our local, normalized velocity to our blend space player:
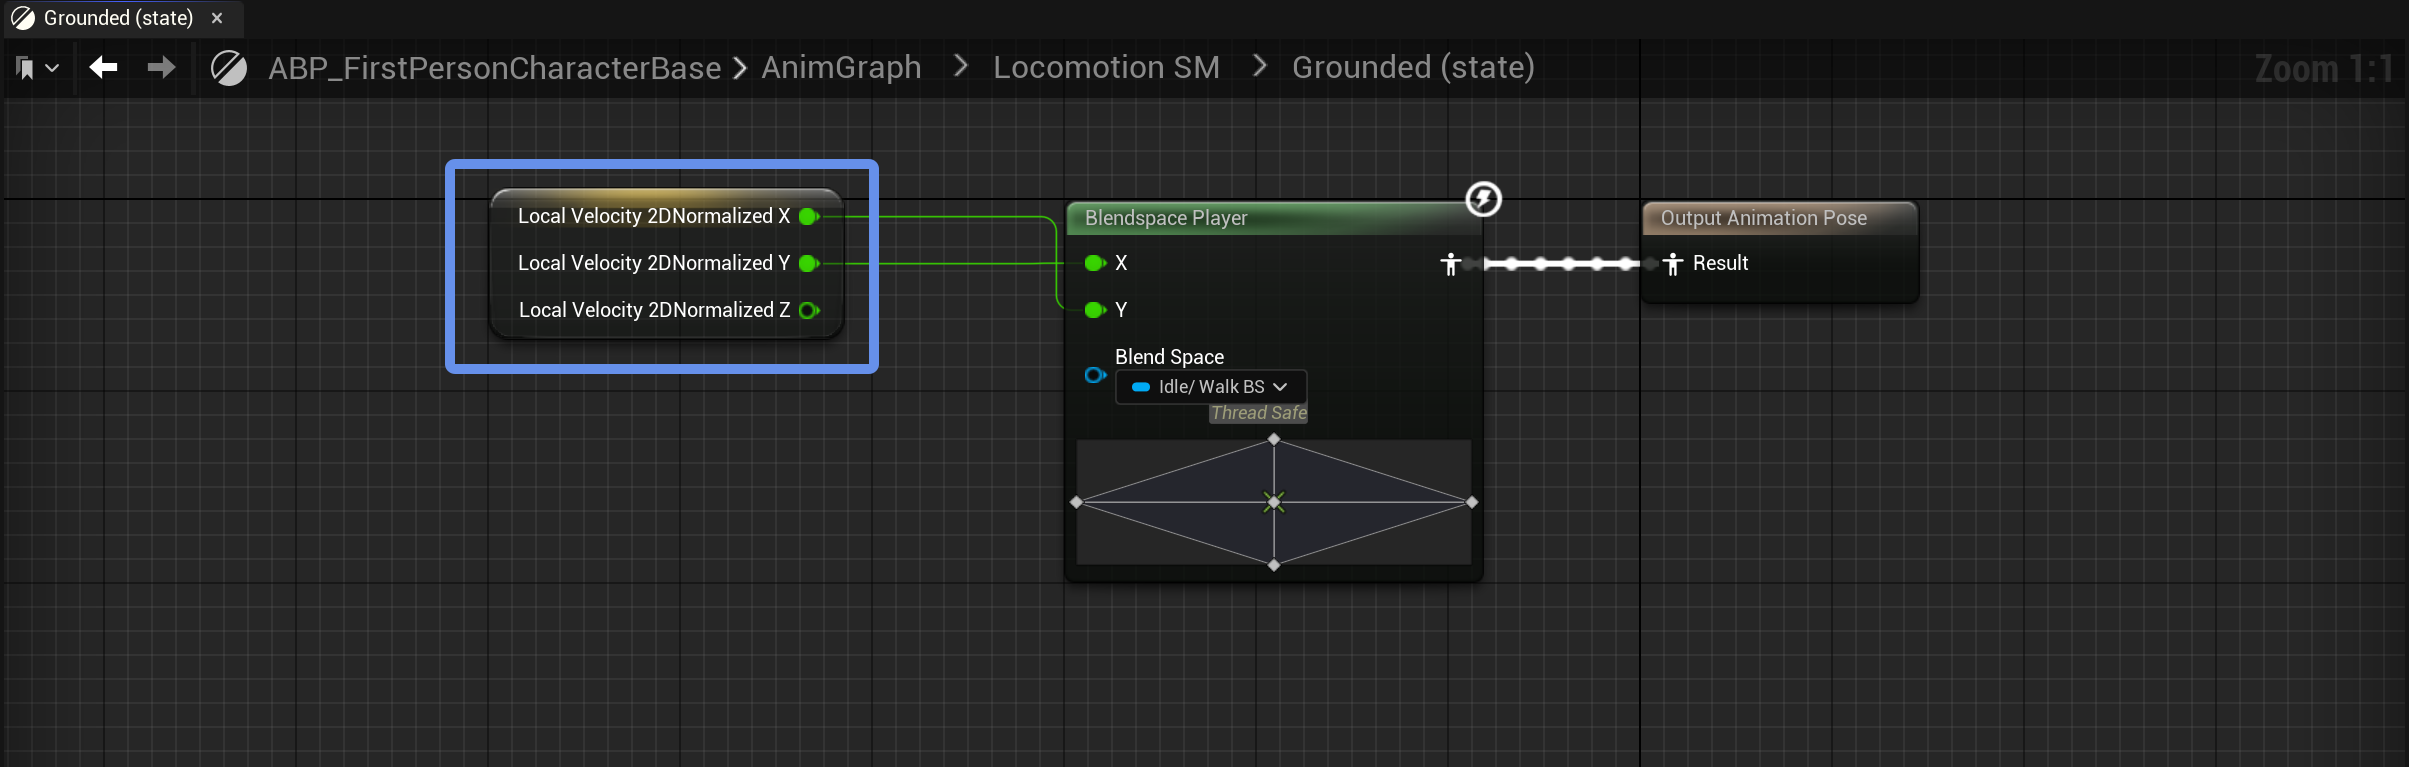
Note that I’m using a 2D blend space to have different animations for walking forward, backward, left, and right. If you just want to use a single Walk animation, use the length of LocalVelocity2DNormalized as your blend space input by connecting a Vector Length node. This is what we actually do in Cloud Crashers; I just wanted to show that this system can also support directional walk animations.
Now, we have a base locomotive pose based on our directional movement speed. But we still need to transition between our Grounded and Airborne states. If we don’t, we’ll keep running when we jump or fall, which isn’t what we want.
To transition between states, we can simply check the character’s current movement mode inside the transition rules:


Remember to use the Property Access node to keep our blueprint thread-safe!
Finally, we have our base pose, based on our directional movement speed and our current movement state:
Additives
Now things get more interesting. To add that extra level of personality to our animations, we’re going to use additive poses to offset the base pose. We want to apply three different additives:
- Movement Sway: Make the character lean toward or lag behind the direction they’re moving.
- Aim Sway: Make the character’s weapon lead or lag behind the player’s aim when they turn.
- Falling Offset: Blend to a
JumpingorLandingpose based on the character’s vertical velocity. This creates a procedural “Jump” animation that is more flexible and, more importantly, looks much nicer than one that uses a state machine (i.e.Grounded->Jump->Falling Up->Apex->Falling Down->Landing->Grounded).
You might hear some people say “rolls,” “aim roll,” or “turning sway” instead of “aim sway.”
Just so it’s clear what we’re trying to achieve, here’s an example of what these poses may look like. This is the set of additive poses for the Knight character:
If you watched the GDC talk linked at the beginning of this post, this is what Matt called the “aim suite.”
Here’s what these animation assets actually look like in Cloud Crashers. Notice how they’re simply an animation sequence that’s one frame-long (yours don’t need to be exactly one frame, but we’ll only ever use one frame of the animation):

Applying these sways and offsets as additive animations allows us to apply them on top of whatever the character animation is currently playing, similar to an aim offset. Whether we’re idling, walking, reloading, or doing anything else, our sways and offsets will still be applied.
For a short explanation of how additive animations actually work, check out the documentation on aim offsets, linked above.
Applying Additives
To apply these additives, we’ll take our base pose and layer them on top. Since we want to apply different additives depending on the direction of the driving variable (e.g. Fall Up with a positive velocity vs. Fall Down with a negative velocity), we can use more blend spaces to determine which additives to play.
Now, we could create another blend space and use an Apply Additive node to apply each one. But a better solution would actually be to use an aforementioned aim offset, because an aim offset is essentially an additive blend space: aim offsets evaluate a blend space and additively apply the result on top of a base pose, which is exactly what we want to do.
Instead of creating an aim offset asset, I’m actually going to create the aim offsets inside the animation blueprint with the Aim Offset Blend Space node. This way, we don’t need to create an aim offset asset for every additive set, for every character; we can just change the additive animation assets in each character’s animation blueprint.

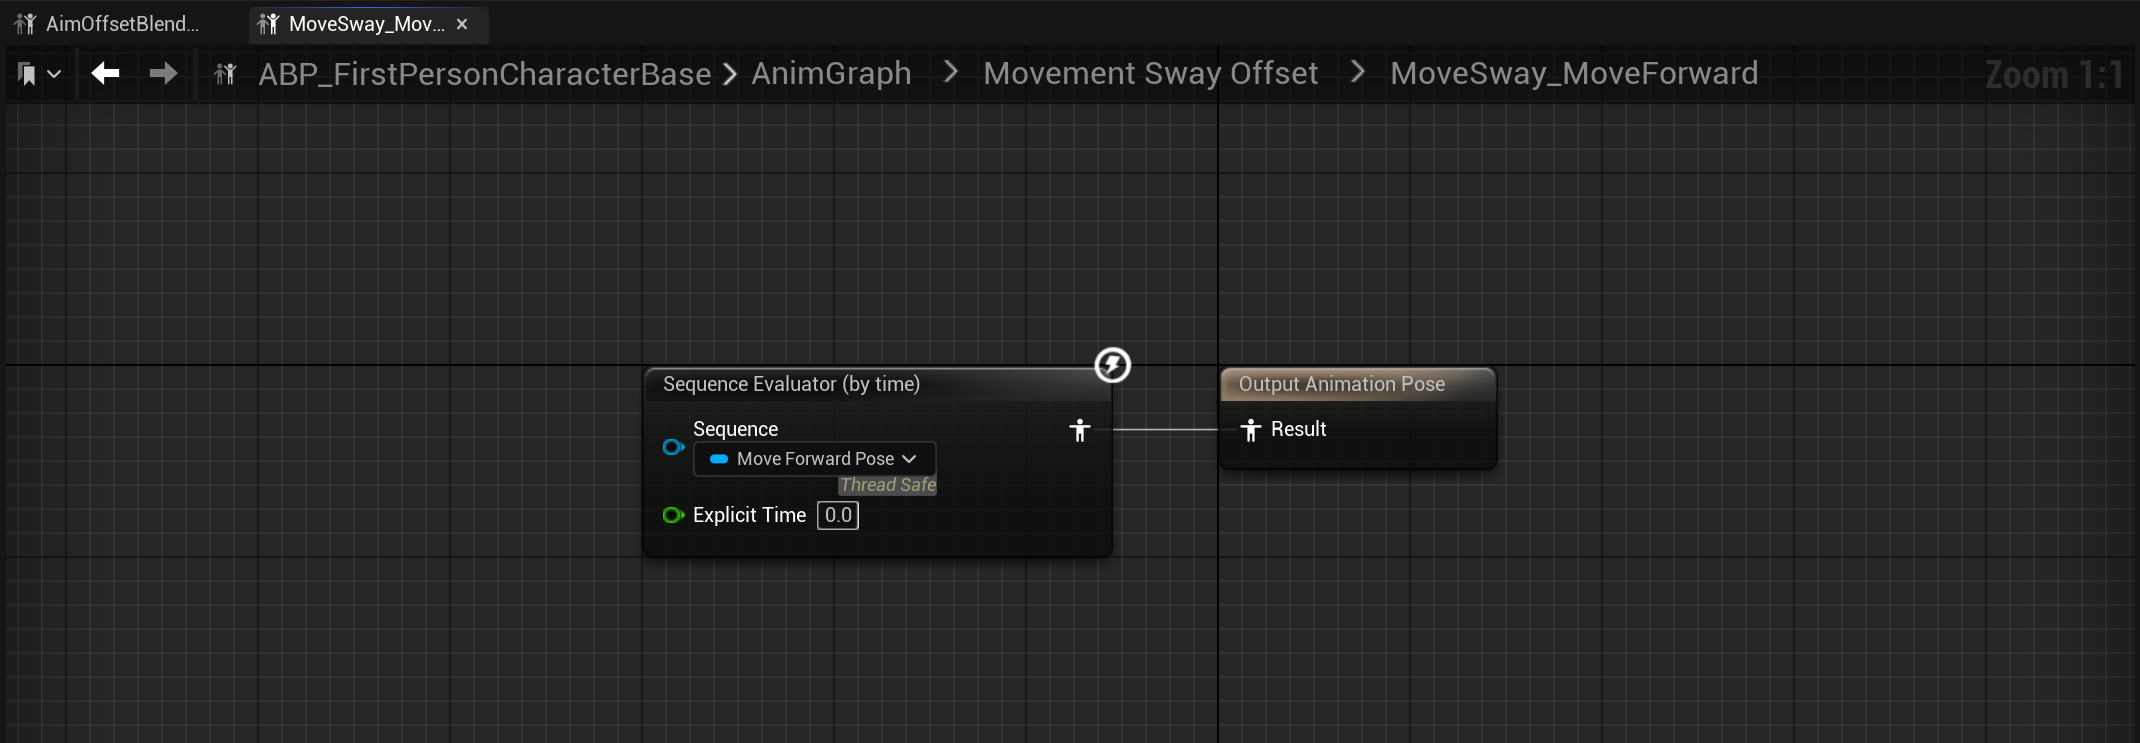
Our Alpha should always be 1.0, so I’ve unchecked Expose as Pin from the Alpha binding. I’m also using a Aim Offset Blend Space 1D for the Falling Offset, since we only need one axis for this offset.
Inside, each aim offset has samples evaluating a bound animation sequence at the extrema of each axis. Since we’re treating our additive animations as poses, we can skip the overhead of actually playing them, and instead just evaluate the pose at their first (and only) frame (specified by the Explicit Time parameter). On the left, you’ll also see the new variables we’ve created to bind our animation assets.
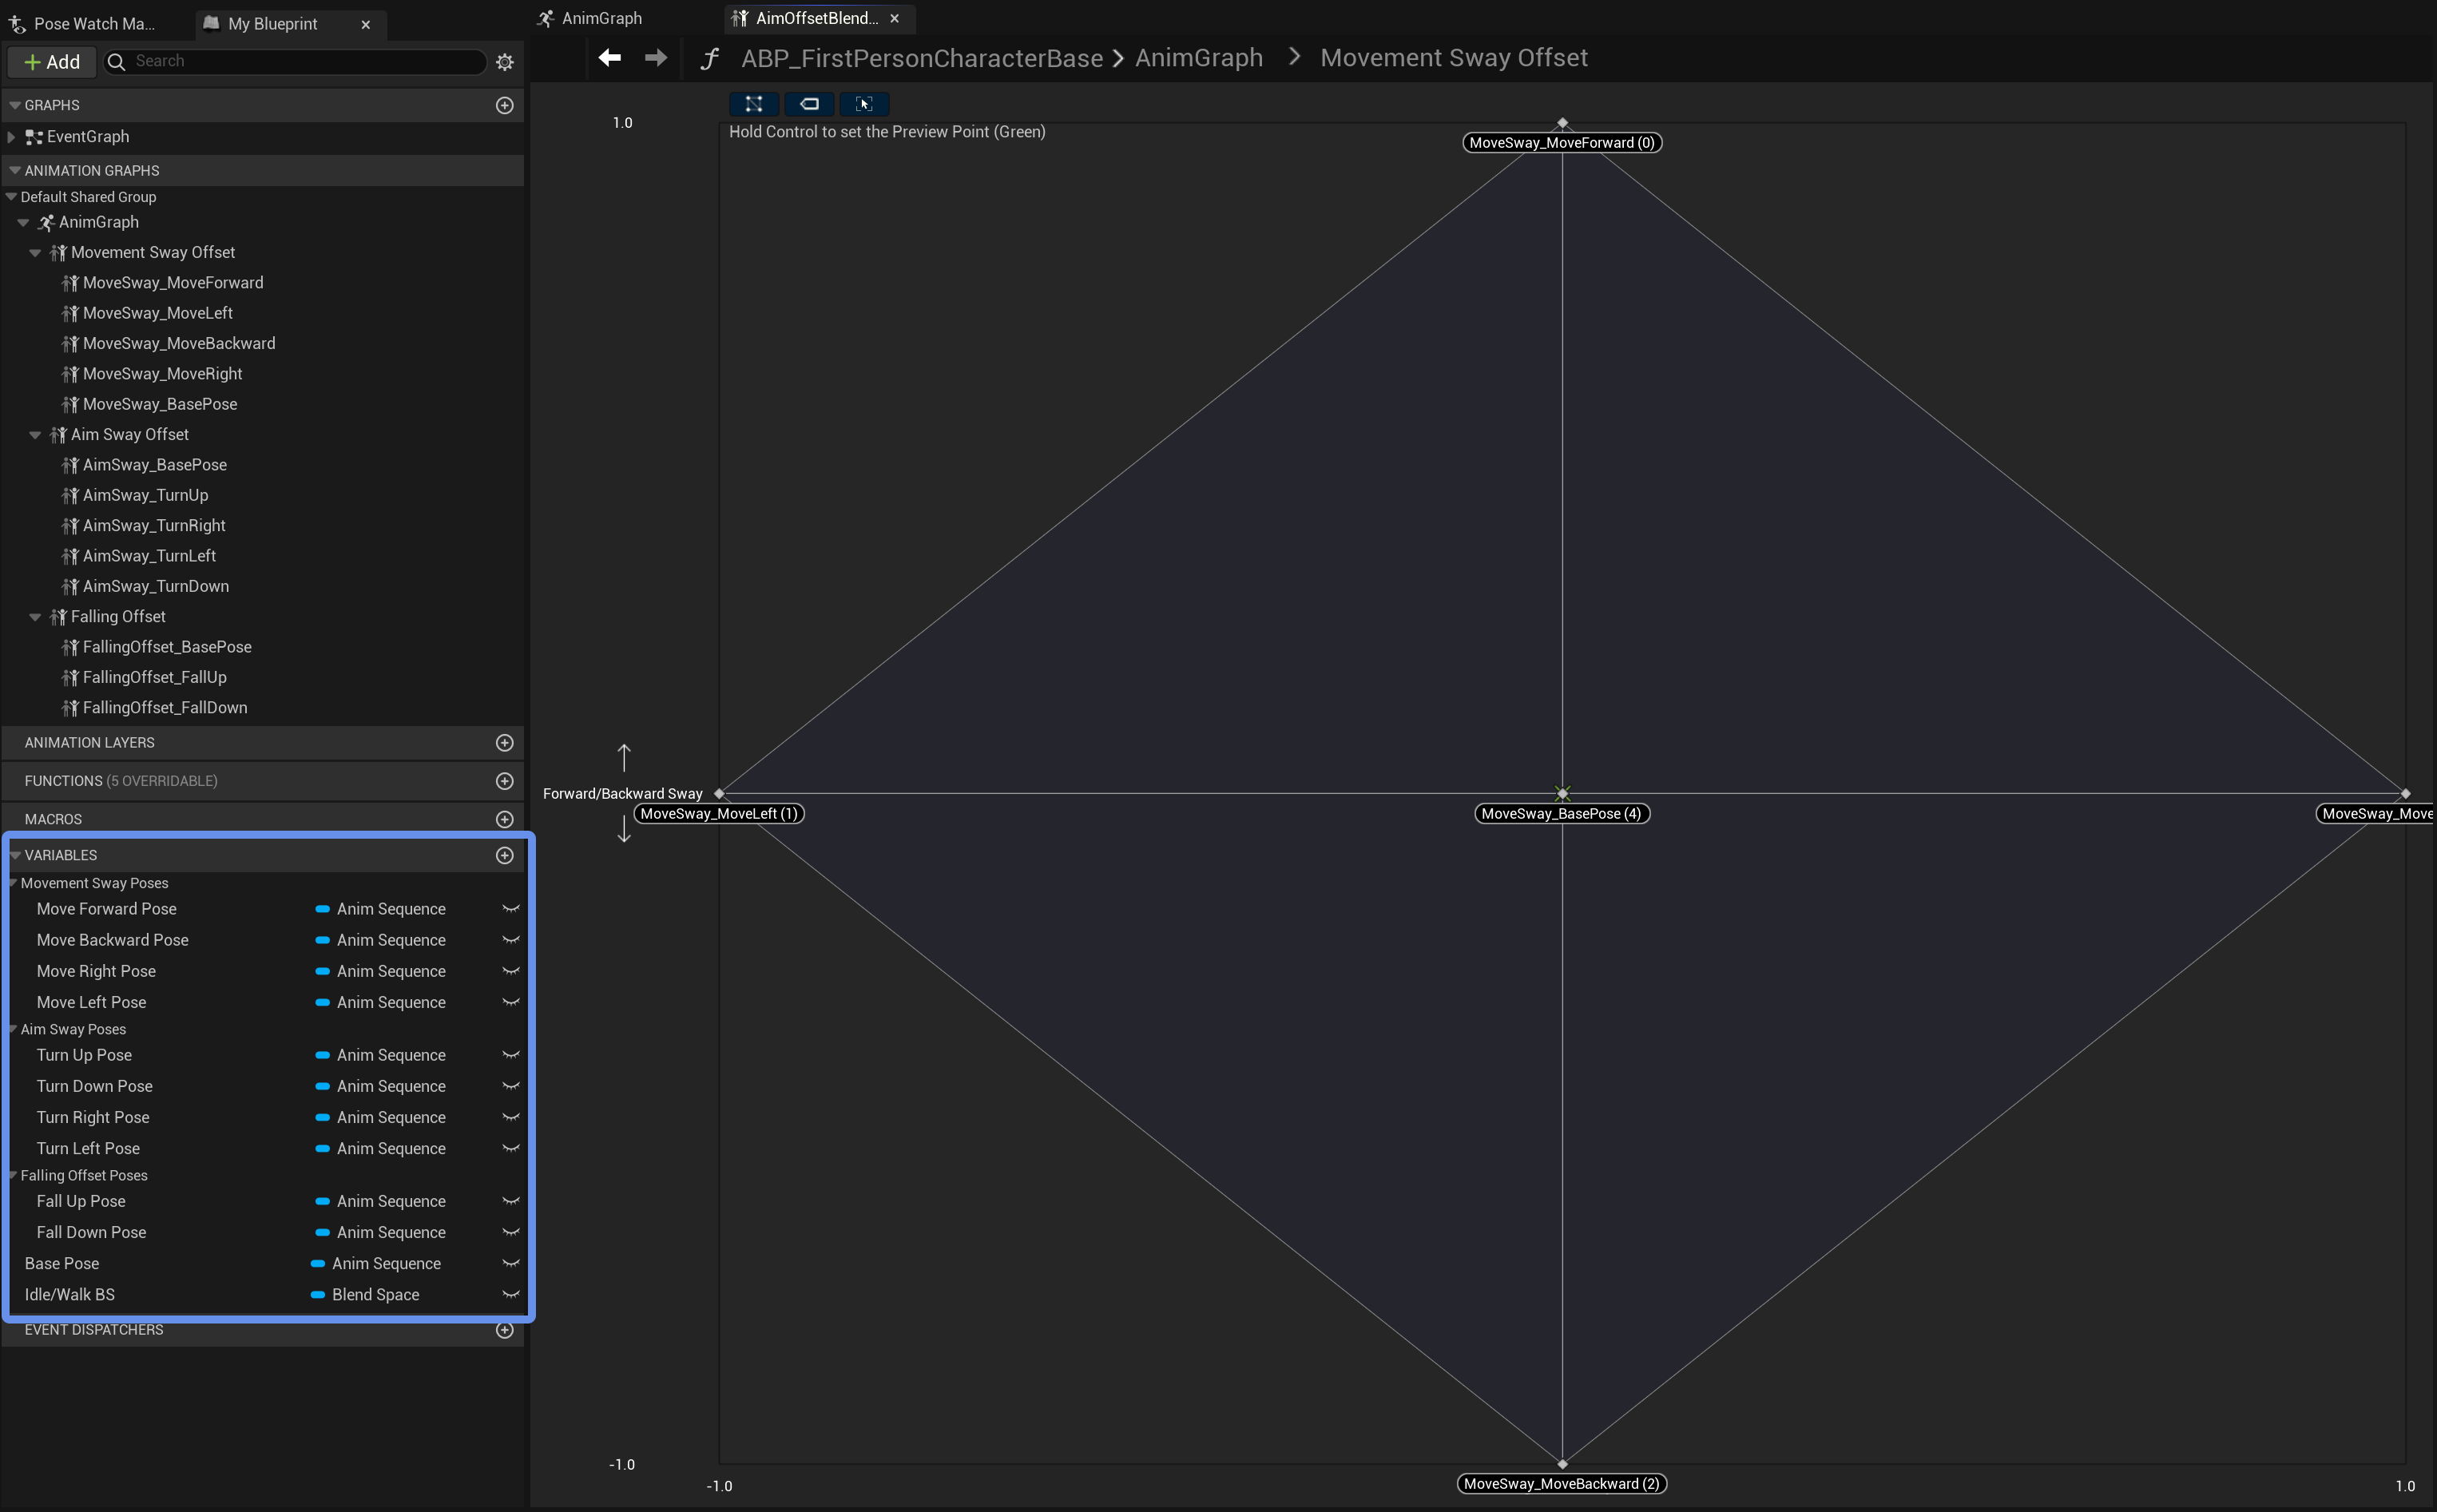
For the samples at the center of our graph ((0, 0), where we don’t want to apply any additives), we’re evaluating whatever pose our additives are defined relative to. This ensures that no additives are applied when the additive value is 0.0. Otherwise, our aim offsets will try to create a base pose by averaging each additive, instead of just leaving the underlying animation alone when we don’t want any additives applied to it.
For Cloud Crashers, our additives are defined relative to the first frame of the Idle animation, which we export as an asset called Aim Forward for convenience. You can see this in the image of the additive animation asset above.
Calculating Additives
Here’s where things get tricky: our blend spaces need parameters to determine how to apply each additive. Let’s consider what values we want to bind to each additive type:
- Movement Sway: Horizontal velocity (how fast we’re moving forwards/backwards and right/left)
- Aim Sway: Rotational velocity (how fast we’re turning up/down and right/left)
- Falling Offset: Vertical velocity (how fast we’re jumping up/falling down)
Logically, if we normalize these values and bind them to our blend spaces, like we did with our locomotion, we should get what we’re looking for. So let’s see what happens when we try this:
Well, that looks… odd. If you looked closely at the Blend Space settings in our aim offsets, you might realize that this is because we aren’t smoothing between our additives.
Characters in Cloud Crashers have an acceleration speed of 16384.0 cm/s, so whenever we start moving in one direction, we reach our maximum velocity very quickly, and when we stop, we return to being idle very quickly. The same issue occurs with our other additives when we turn, jump, or fall.
By adding Smoothing Time to our aim offsets, we’ll blend between additives more slowly, creating a smoother transition. Let’s try using the Ease In/Out smoothing type:
Okay, some of those look a little better. Maybe one of the other smoothing types will look better?
I’ll save you the time: they don’t. So what’s wrong?
Let’s take a second to think about what effect we actually want to achieve.
We want to realistically simulate how our body organically reacts to movement. Our current method is linearly interpolating between different poses, essentially just “snapping” between poses depending on the direction we’re moving, turning, or falling. Mathematically, blending poses like that (like we did in the first video above) looks like this:
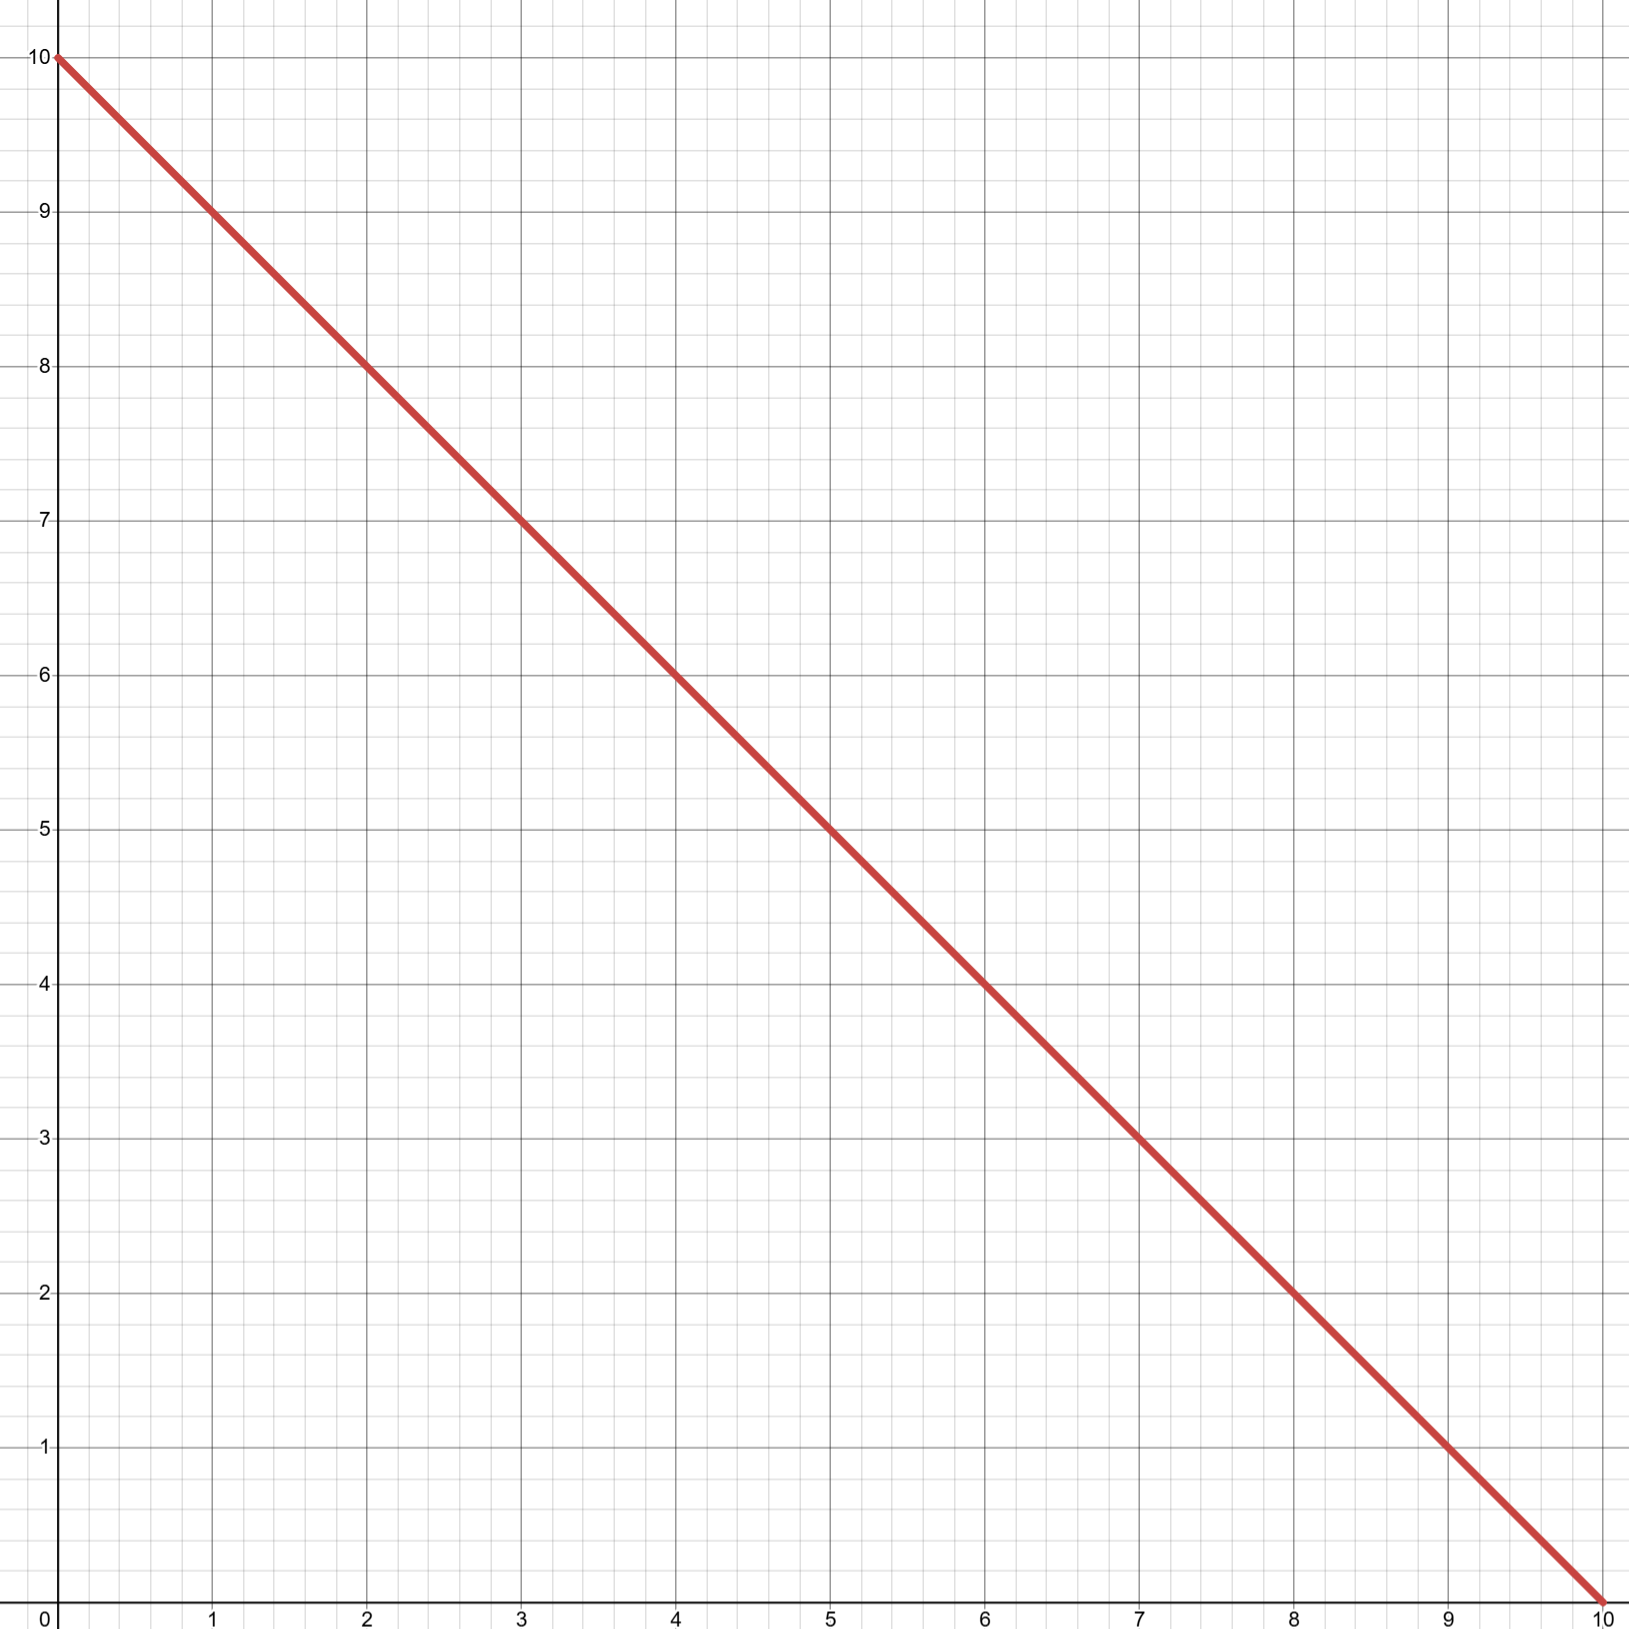
The problem is that our bodies don’t move that mechanically. When our muscles move, they don’t “snap” into place. They take time to start moving, might overshoot their destination, and take time to stop and settle into place. Visually, our muscles move between positions more like this:

Well, fortunately for us, there’s a mathematical model that does exactly this, and it’s what Overwatch uses to get their natural-looking sways: springs.
Springs
Springs (or, more technically, “oscillating systems”) provide a perfect way to simulate how our bodies move because, from a visual perspective, they move very similarly. Springs have tension, so they take time to start and stop moving, and their bounciness causes them to oscillate back and forth before settling back into place.
The graph above is a simple equation called damped oscillation. But we’ll be using a more robust model that’s already built into Unreal Engine.
So, how can we leverage spring models to apply additives more naturally?
The current magnitude of each of our additives (i.e. how heavily they’re applied) will be determined by a scalar variable called the Current Value. Each frame, we’ll calculate a Target Value using the data from that frame. For example, if we’re moving forward very fast, our target value for our forward/backward movement sway will be a large positive number (positive for forward, negative for backward). But if we suddenly stop moving, the target value will be 0.
Next, we’ll plug our Current Value and Target Value into a spring model. Our spring model will give us a new Current Value by stepping towards the Target Value, depending on how much time passed this frame. Finally, we update Current Value, and repeat this process the next frame, and so on.
By continuously blending towards whichever pose is desired by our additives’ dependent values (horizontal, rotational, and vertical velocity, respectively), this method not only achieves more natural-looking blending, but also fixes our smoothing issue. Linear interpolation isn’t great at handling sharp changes (like quickly turning back and forth in the video above), but springs are great at it. This is because of how springs damp oscillations: they’re able to handle these dramatic changes, and can smoothly interpolate between rapidly changing targets without breaking.
If that’s confusing, skip ahead to our final results, and compare how quickly turning right and left looks compared to the videos above. This will more clearly demonstrate the effects of spring damping.
Calculating Aim Data
We’ll be using the same method of calculation for all three of our additives. We already have the data we need for our movement sway and falling offset (which we collected in our UpdateVelocityData function). But we still need to calculate some data for our aim sway.
Our aim sway is determined by how quickly our character is turning right or left and up or down. Since this is a first-person game, our character’s rotation is determined by our camera. So all we need to do is calculate how much our camera rotates each frame along each axis: yaw (right/left) and pitch (up/down).
We’ll actually use our pawn’s BaseAimRotation, which gives us the controller’s aim rotation, instead of wasting time trying to find the player’s camera.
Let’s create a new function to calculate this data, with a float parameter called DeltaSeconds. This will be given by NativeThreadSafeUpdateAnimation, and it tells us how much time has passed this frame (e.g. at 60 frames/second: 1.0 seconds ÷ 60.0 frames ≈ 0.0167 seconds/frame). We didn’t need this for our movement data because actors already track their velocity, but we’ll need to calculate our camera’s rotation speed ourselves.
protected:

    // Calculate aim data this frame.
    void UpdateAimData(float DeltaSeconds);
void UFirstPersonCharacterAnimInstance::NativeThreadSafeUpdateAnimation(float DeltaSeconds)
{
// ...
UpdateAimData(DeltaSeconds);
}Let’s also add the variables we’ll be calculating:
protected:

    // This character's current base aim rotation.
    UPROPERTY(BlueprintReadOnly, Category = "Aim Data")
    FRotator AimRotation;

    // The normalized rate at which the owning character's aim yaw is changing, in degrees/second.
    UPROPERTY(BlueprintReadOnly, Category = "Aim Data", DisplayName = "Aim Speed (Right/Left)")
    float AimSpeedRightLeft;

    // The normalized rate at which the owning character's aim pitch is changing, in degrees/second.
    UPROPERTY(BlueprintReadOnly, Category = "Aim Data", DisplayName = "Aim Speed (Up/Down)")
    float AimSpeedUpDown;
We want to calculate our rotation speed in Degrees/Second. We can do this with the following formula:
Degrees/Frame is the amount we’ve rotated this frame, and we can calculate Frames/Second by taking the inverse of DeltaSeconds (since DeltaSeconds represents Seconds/Frame):
void UFirstPersonCharacterAnimInstance::UpdateAimData(float DeltaSeconds)
{
    const FRotator PreviousAimRotation = AimRotation;

    AimRotation = TryGetPawnOwner()->GetBaseAimRotation();
    AimRotation.Pitch = FRotator::NormalizeAxis(AimRotation.Pitch); // Fix for a problem with how UE replicates aim rotation.

    // Use a normalized delta to account for winding (e.g. 359.0 -> 1.0 should be 2.0, not -358.0).
    const FRotator RotationDelta = UKismetMathLibrary::NormalizedDeltaRotator(AimRotation, PreviousAimRotation);

    const float InverseDeltaSeconds = ((DeltaSeconds > 0.0f) ? (1.0f / DeltaSeconds) : 0.0f); // Avoid dividing by 0.

    AimSpeedRightLeft = RotationDelta.Yaw * InverseDeltaSeconds;
    AimSpeedUpDown = RotationDelta.Pitch * InverseDeltaSeconds;
}
In Cloud Crashers, we skip the aim speed calculation the first frame. If our character is spawned, for example, with a rotation of (0, 0, 180), our initial aim speed will be 180 degrees/second, because AimRotation is initialized to (0, 0, 0). On the first frame, we just update AimRotation, to properly initialize it, and leave our aim speeds at 0.0 to avoid this.
Now, we have our current aim speed in Degrees/Second.
Calculating Springs
Finally, it’s time to calculate our additive values. For each of our three additive sets, we’ll need three sets of variables.
First, we need CurrentSpring scalar variables to track the current value of each additive (this is the Current Value mentioned earlier). These variables are what we’ll actually use as the parameters for our aim offsets.
Second, we need SpringState variables of type FFloatSpringState. These are used by spring models to track the current state of each spring. But Unreal is nice enough to handle these variables for us; all we need to do is define them and pass them into the spring model calculations.
Lastly, we need a set of variables to define the properties of each spring model. This will allow us to finely tune the behavior of each spring: we can control how quickly they move, how stiff they are, how much they oscillate, etc. This is the real highlight of the entire animation system: having unique, fully customizable models for every additive of every character allows us to give each character a distinct look and feel, and gives us the creative freedom to easily make that look and feel whatever we want!
Spring models are defined by a few different properties. So before we start adding any variables, let’s go ahead and create a new structure to more efficiently define our different spring models:
// FirstPersonCharacterAnimInstance.h, right above our FirstPersonCharacterAnimInstance class.

/**
 * Defines the behavior of a spring model. Used for performing calculations for sway animations.
 */
USTRUCT(BlueprintType)
struct FFloatSpringModelData
{
    GENERATED_BODY()

    /* Controls the amplitude of the spring model. This value is signed, so setting it to a negative number reverses the
     * direction of the spring (e.g. to create the effect of leading versus lagging). */
    UPROPERTY(EditDefaultsOnly, BlueprintReadOnly, Category = "Spring Model", Meta = (ClampMin = -10.0f, UIMin = -10.0f, ClampMax = 10.0f, UIMax = 10.0f))
    float InterpSpeed = 1.0f;

    /* Represents the stiffness of this spring. Higher values reduce overall oscillation. Scales with Mass (i.e. a lower
     * mass will make the spring appear less stiff). */
    UPROPERTY(EditDefaultsOnly, BlueprintReadOnly, Category = "Spring Model", Meta = (ClampMin = 0.0f, UIMin = 0.0f, ClampMax = 100.0f, UIMax = 100.0f))
    float Stiffness = 25.0f;

    /* The amount of damping applied to the spring. 0.0 means no damping (full oscillation), 1.0 means full damping
     * (no oscillation). */
    UPROPERTY(EditDefaultsOnly, BlueprintReadOnly, Category = "Spring Model", Meta = (ClampMin = 0.0f, UIMin = 0.0f, ClampMax = 1.0f, UIMax = 1.0f))
    float CriticalDampingFactor = 0.5f;

    // A multiplier that simulates the spring's, affecting the amount of force required to oscillate it.
    UPROPERTY(EditDefaultsOnly, BlueprintReadOnly, Category = "Spring Model", Meta = (ClampMin = 1.0f, UIMin = 1.0f, ClampMax = 100.0f, UIMax = 100.0f))
    float Mass = 10.0f;
};
Clamp Min/Max and UI Min/Max define the lower and upper bounds when setting these variables in the editor (Clamp limits the values set, UI defines a slider for adjusting them). I’ve found these to be good values through testing, but feel free to tweak them if you want.
Movement Sway
Let’s start with our first additive suite: movement sway. Here are the variables we’ll need in our header:
// Spring models.
protected:

    // The spring model used to drive forward/backward movement sway for this animation instance.
    UPROPERTY(EditDefaultsOnly, Category = "Spring Models|Movement Sway", DisplayName = "Forward/Backward Sway Spring Model")
    FFloatSpringModelData MoveSwayForwardBackwardSpringModelData;

    // The spring model used to drive right/left movement sway for this animation instance.
    UPROPERTY(EditDefaultsOnly, Category = "Spring Models|Movement Sway", DisplayName = "Right/Left Sway Spring Model")
    FFloatSpringModelData MoveSwayRightLeftSpringModelData;

// Current spring values.
protected:

    // The current spring value of the forward/backward movement sway spring.
    UPROPERTY(BlueprintReadOnly, Category = "Sway Data|Movement Sway", DisplayName = "Current Movement Sway Value (Forward/Backward)")
    float CurrentSpringMoveForwardBackward;

    // The current spring value of the right/left movement sway spring.
    UPROPERTY(BlueprintReadOnly, Category = "Sway Data|Movement Sway", DisplayName = "Current Movement Sway Value (Right/Left)")
    float CurrentSpringMoveRightLeft;

// Internal spring states.
private:

    // Spring state for the forward/backward movement sway's spring calculations.
    FFloatSpringState SpringStateMoveForwardBackward;

    // Spring state for the right/left movement sway's spring calculations.
    FFloatSpringState SpringStateMoveRightLeft;
You might realize that FirstPersonCharacterAnimInstance is starting to get pretty long (good thing we didn’t do this in our animation blueprint!). If you want to see how we keep everything organized in Cloud Crashers, check out our FirstPersonCharacterAnimInstance.h file.
Next, let’s create a new function to perform our movement sway update.
protected:

    // Updates movement sway data using a spring model.
    void UpdateMovementSwayData();
void UFirstPersonCharacterAnimInstance::NativeThreadSafeUpdateAnimation(float DeltaSeconds)
{
// ...
UpdateMovementSwayData();
}Inside, we’ll start by calculating the Target Value for our forward/backward movement sway’s spring. We do this by normalizing our current speed with our character’s maximum speed (just like we did for our locomotion blend space), and scaling it with our spring model’s InterpSpeed.
void UFirstPersonCharacterAnimInstance::UpdateMovementSwayData()
{
    // Use the owning pawn's maximum movement speed as the bound for movement sway.
    const float MaxMovementSpeed = TryGetPawnOwner()->GetMovementComponent()->GetMaxSpeed();

    // Calculate the forward/backward movement spring target.
    const float ClampedSpeedX = FMath::Clamp(LocalVelocity2D.X, -MaxMovementSpeed, MaxMovementSpeed);
    const float SpringTargetForwardBackward = UKismetMathLibrary::NormalizeToRange((ClampedSpeedX * MoveSwayForwardBackwardSpringModelData.InterpSpeed), 0.0f, MaxMovementSpeed);
}
Next, we’ll retrieve our DeltaSeconds to use in our spring calculation. But if DeltaSeconds is too large, we’ll return early. We do this to avoid unnecessary calculations at low frame rates. At these frame rates, our movement and aim values are being updated so slowly that our sways and offsets will look choppy (plus, this skips unnecessary calculations during poor performance: no one will notice a missing sway at 10 FPS):
void UFirstPersonCharacterAnimInstance::UpdateMovementSwayData()
{
    // ...

    // Don't bother performing spring calculations at low frame-rates.
    const float DeltaSeconds = GetDeltaSeconds();
    if (DeltaSeconds > MIN_DELTA_TIME_FOR_SPRING_CALCULATIONS)
    {
        return;
    }
}
You can hard-code any value for this. In Cloud Crashers, we use a macro called MIN_DELTA_TIME_FOR_SPRING_CALCULATIONS. This is defined at the top of the file like this:
// Inverse of the minimum frame rate required to perform spring calculations.
#define MIN_DELTA_TIME_FOR_SPRING_CALCULATIONS 0.1f // 10 fps
Before we perform the spring calculation, let’s also scale our spring model’s Stiffness value. The effective range of the Stiffness parameter in the spring calculation is a little hard to work with. Scaling it by a constant value can change this range to something more intuitive for animators. In Cloud Crashers, we use another macro set to a value of 35.0, which results the range close to 0 -> 100:
/* Universal multiplier applied to spring model stiffness. Used to scale stiffness values to a more intuitive
 * range for animators. */
#define SPRING_STIFFNESS_SCALER 35.0f
void UFirstPersonCharacterAnimInstance::UpdateMovementSwayData()
{
// ...
/* Apply an arbitrary multiplier to the spring's stiffness value. This scales viable spring stiffness values to a
* more intuitive range of (0 -> 100) when adjusting spring model data. */
const float EffectiveStiffness = MoveSwayForwardBackwardSpringModelData.Stiffness * SPRING_STIFFNESS_SCALER;
}Finally, we’ll perform the spring calculation. This is as easy as calling Unreal’s built-in function for float spring interpolation:
void UFirstPersonCharacterAnimInstance::UpdateMovementSwayData()
{
    // ...

    // Perform the spring calculation with the given data.
    CurrentSpringMoveForwardBackward = UKismetMathLibrary::FloatSpringInterp
    (
        CurrentSpringMoveForwardBackward,
        SpringTargetForwardBackward,
        SpringStateMoveForwardBackward,
        EffectiveStiffness,
        MoveSwayForwardBackwardSpringModelData.CriticalDampingFactor,
        DeltaSeconds,
        MoveSwayForwardBackwardSpringModelData.Mass,
        1.0f,
        false
    );
}
Now, we need to do the exact same thing for our right/left movement sway. And since we’ll be performing this exact same process for every additive calculation, it’s a good idea to move most of this code to a new helper function, which we can call UpdateFloatSpringInterp:
protected:

    /**
     * Performs a float spring interpolation using the given data.
     *
     * @param SpringCurrent			The current spring interpolation value.
     * @param SpringTarget			The target spring interpolation value.
     * @param SpringState			Data for the calculating spring model. Each spring model should use a unique spring
     *                                          state variable.
     * @param SpringData			Data used to define the behavior of the spring model.
     * @return					The resulting spring interpolation value.
     */
    float UpdateFloatSpringInterp(float SpringCurrent, float SpringTarget, FFloatSpringState& SpringState, FFloatSpringModelData& SpringData) const;
float UFirstPersonCharacterAnimInstance::UpdateFloatSpringInterp(float SpringCurrent, float SpringTarget, FFloatSpringState& SpringState, FFloatSpringModelData& SpringData) const
{
const float DeltaSeconds = GetDeltaSeconds();
// Don't bother performing spring calculations at low frame-rates.
if (DeltaSeconds > MIN_DELTA_TIME_FOR_SPRING_CALCULATIONS)
{
return SpringCurrent;
}
/* Apply an arbitrary multiplier to the spring's stiffness value. This scales viable spring stiffness values to a
* more intuitive range of (0 - 100) when adjusting spring model data. */
const float EffectiveStiffness = SpringData.Stiffness * SPRING_STIFFNESS_SCALER;
// Perform the spring calculation with the given data.
return UKismetMathLibrary::FloatSpringInterp
(
SpringCurrent,
SpringTarget,
SpringState,
EffectiveStiffness,
SpringData.CriticalDampingFactor,
DeltaSeconds,
SpringData.Mass,
1.0f,
false
);
}Now we can replace most of the code in our UpdateMovementSwayData. Here’s what the final version of the function looks like when we also add the calculation for our right/left movement sway:
void UFirstPersonCharacterAnimInstance::UpdateMovementSwayData()
{
    // Use the owning pawn's maximum movement speed as the bound for movement sway.
    const float MaxMovementSpeed = TryGetPawnOwner()->GetMovementComponent()->GetMaxSpeed();

    // Calculate the forward/backward movement spring.
    const float ClampedSpeedX = FMath::Clamp(LocalVelocity2D.X, -MaxMovementSpeed, MaxMovementSpeed);
    const float SpringTargetForwardBackward = UKismetMathLibrary::NormalizeToRange((ClampedSpeedX * MoveSwayForwardBackwardSpringModelData.InterpSpeed), 0.0f, MaxMovementSpeed);

    CurrentSpringMoveForwardBackward = UpdateFloatSpringInterp
    (
        CurrentSpringMoveForwardBackward,
        SpringTargetForwardBackward,
        SpringStateMoveForwardBackward,
        MoveSwayForwardBackwardSpringModelData
    );

    // Calculate the right/left movement spring.
    const float ClampedSpeedY = FMath::Clamp(LocalVelocity2D.Y, -MaxMovementSpeed, MaxMovementSpeed);
    const float SpringTargetRightLeft = UKismetMathLibrary::NormalizeToRange((ClampedSpeedY * MoveSwayRightLeftSpringModelData.InterpSpeed), 0.0f, MaxMovementSpeed);

    CurrentSpringMoveRightLeft = UpdateFloatSpringInterp
    (
        CurrentSpringMoveRightLeft,
        SpringTargetRightLeft,
        SpringStateMoveRightLeft,
        MoveSwayRightLeftSpringModelData
    );
}
Perfect! And before we move on, we can check to see if this works. All we have to do is plug our CurrentSpringMoveForwardBackward and CurrentSpringMoveRightLeft variables into our aim offset:
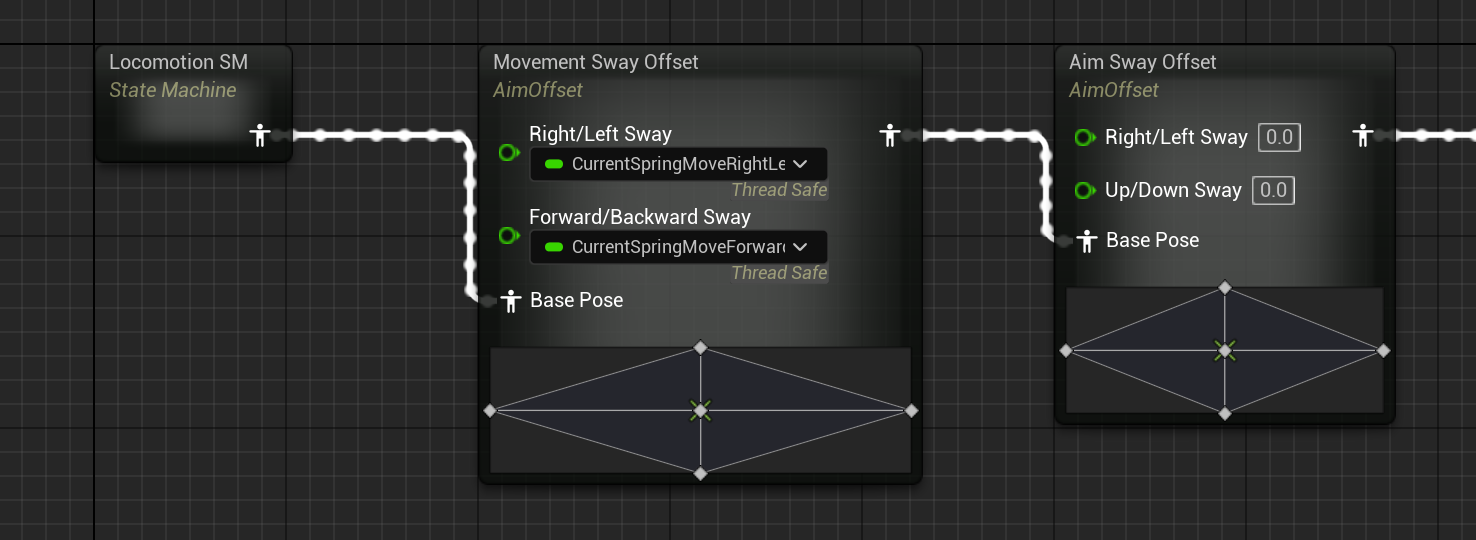
If we test out our animation blueprint now, we’ll see our movement sway works! We can adjust our spring models’ properties inside the animation blueprint to get whatever effect we want. We can even edit them during PIE and see our sway change in real time!
Aim Sway
Now that our movement sway is working, implementing aim sway will be really easy, because we can use the exact same method!
We’ll start with another set of variables in our header file:
// Spring models.
protected:

    // The spring model used to drive right/left aim sway for this animation instance.
    UPROPERTY(EditDefaultsOnly, Category = "Spring Models|Aim Sway", DisplayName = "Right/Left Sway Spring Model")
    FFloatSpringModelData AimSwayRightLeftSpringModelData;

    // The spring model used to drive up/down aim sway for this animation instance.
    UPROPERTY(EditDefaultsOnly, Category = "Spring Models|Aim Sway", DisplayName = "Up/Down Sway Spring Model")
    FFloatSpringModelData AimSwayUpDownSpringModelData;

// Current spring values.
protected:

    // The current spring value for the right/left aim sway spring.
    UPROPERTY(BlueprintReadOnly, Category = "Sway Data|Aim Sway", DisplayName = "Current Aim Sway Value (Right/Left)")
    float CurrentSpringAimRightLeft;

    // The current spring value for the up/down aim sway spring.
    UPROPERTY(BlueprintReadOnly, Category = "Sway Data|Aim Sway", DisplayName = "Current Aim Sway Value (Up/Down)")
    float CurrentSpringAimUpDown;

// Internal spring states.
private:

    // Spring state for the right/left aim sway's spring calculations.
    FFloatSpringState SpringStateAimRightLeft;

    // Spring state for the up/down aim sway's spring calculations.
    FFloatSpringState SpringStateAimUpDown;
… and another function for updating our aim sway values:
protected:

    // Updates aim sway data using a spring model.
    void UpdateAimSwayData();
void UFirstPersonCharacterAnimInstance::NativeThreadSafeUpdateAnimation(float DeltaSeconds)
{
// ...
UpdateAimSwayData();
}Now, all we have to do is calculate our spring values, using our aim speed this time (which we already calculated in Calculating Aim Data).
To do this, we need to normalize our aim speed, which is a little tricky, because not every player looks around at the same speed.
If we wanted this to be really consistent, we could use the player’s sensitivity value for mice, and their controller’s turn-rate for gamepads. But for the sake of simplicity, we can hard-code some arbitrary value (the difference is hardly noticeable):
void UFirstPersonCharacterAnimInstance::UpdateAimSwayData()
{
    const float MaxAimSpeed = 720.0f;
    const float MaxAimSpeedUpDown = (MaxAimSpeed / 2.0f); // Halved because characters' pitch has half the range of their yaw: (-90 -> 90) vs. (0 -> 360).
}
Note that we half the value for up/down sway because it has a different range of rotation.
Now, we can perform the exact same calculation that we did for our movement sway: clamping our speed, calculating the spring target, and reusing our UpdateFloatSpringInterp helper to calculate the spring’s new value:
void UFirstPersonCharacterAnimInstance::UpdateAimSwayData()
{
    const float MaxAimSpeed = 720.0f;
    const float MaxAimSpeedUpDown = (MaxAimSpeed / 2.0f); // Halved because characters' pitch has half the range of their yaw: (-90 -> 90) vs. (0 -> 360).

    // Calculate the right/left aim sway spring.
    const float ClampedSpeedRightLeft = FMath::Clamp(AimSpeedRightLeft, -MaxAimSpeed, MaxAimSpeed);
    const float SpringTargetRightLeft = UKismetMathLibrary::NormalizeToRange((ClampedSpeedRightLeft * AimSwayRightLeftSpringModelData.InterpSpeed), 0.0f, MaxAimSpeed);

    CurrentSpringAimRightLeft = UpdateFloatSpringInterp
    (
        CurrentSpringAimRightLeft,
        SpringTargetRightLeft,
        SpringStateAimRightLeft,
        AimSwayRightLeftSpringModelData
    );

    // Calculate the up/down aim sway spring.
    const float ClampedSpeedUpDown = FMath::Clamp(AimSpeedUpDown, -MaxAimSpeedUpDown, MaxAimSpeedUpDown);
    const float SpringTargetUpDown = UKismetMathLibrary::NormalizeToRange((ClampedSpeedUpDown * AimSwayUpDownSpringModelData.InterpSpeed), 0.0f, MaxAimSpeedUpDown);

    CurrentSpringAimUpDown = UpdateFloatSpringInterp
    (
        CurrentSpringAimUpDown,
        SpringTargetUpDown,
        SpringStateAimUpDown,
        AimSwayUpDownSpringModelData
    );
}
Plug our spring values into our aim offset…
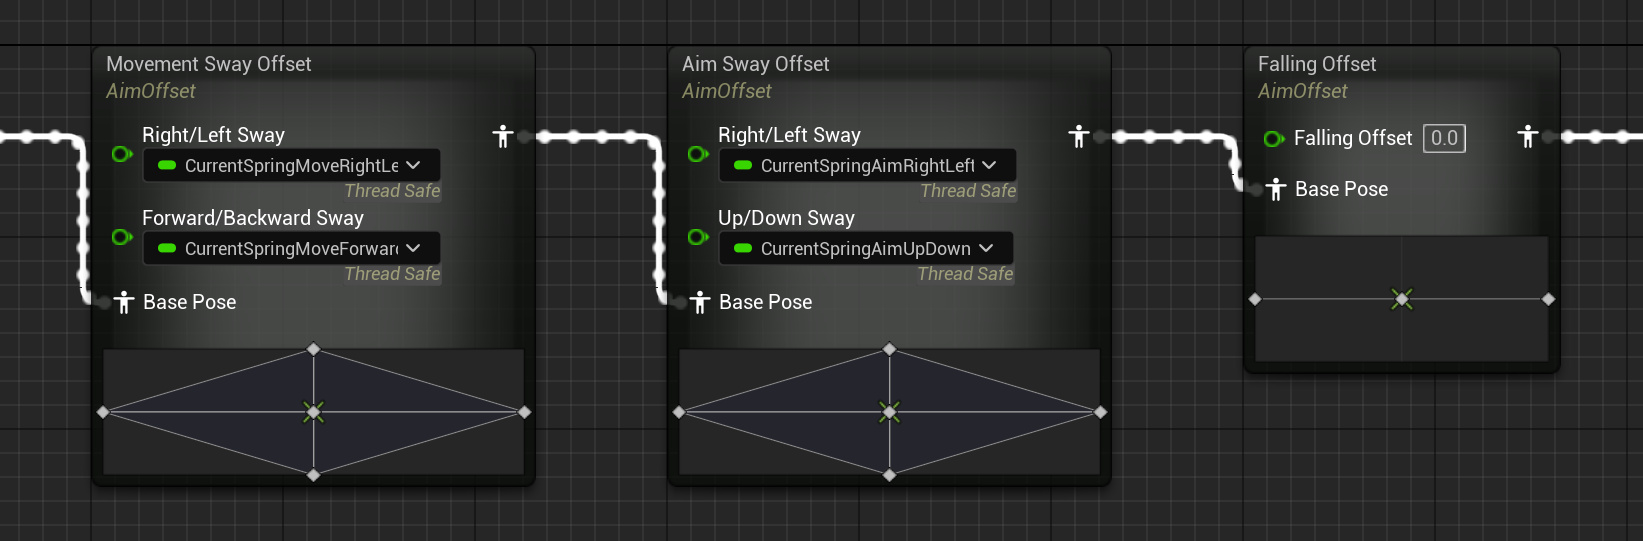
… and now we’ve got aim sway, too!
Falling Offset
Last, but not least, we’ve got our falling offset—which we’re using to create a procedural jump animation, in case you forgot.
To do that, all we need to do is repeat this process one more time. Fortunately, we only need to calculate one spring this time; our other additives had two axes (forward/backward and right/left, and right/leftt and up/down), but our falling offset just has one: our vertical velocity.
One last time, let's declare our variables:

	// Falling offset.

protected:

    // The spring model used to drive the falling (vertical movement) offset for this animation instance.
    UPROPERTY(EditDefaultsOnly, Category = "Spring Models|Falling Offset", DisplayName = "Falling Offset Spring Model")
    FFloatSpringModelData FallingOffsetSpringModelData;

protected:

    // The current spring value of the falling offset spring.
    UPROPERTY(BlueprintReadOnly, Category = "Sway Data|Falling Offset", DisplayName = "Current Falling Offset Value")
    float CurrentSpringFalling;

private:

    // Spring state for the falling offset's spring calculations.
    FFloatSpringState SpringStateFalling;
And let’s create one last function to update our falling offset spring:
protected:

    // Updates falling offset data using a spring model.
    void UpdateFallingOffsetData();
void UFirstPersonCharacterAnimInstance::NativeThreadSafeUpdateAnimation(float DeltaSeconds)
{
// ...
UpdateFallingOffsetData();
}Thankfully, updating our last spring value is really easy. We already have our vertical velocity; all we need to do is normalize it with the velocity at which we jump, since that’s the fastest we’ll ever jump upwards, and it works well when falling down, too:
void UFirstPersonCharacterAnimInstance::UpdateFallingOffsetData()
{
    // Use the owning pawn's jump velocity as the bound for the falling offset.
    const float MaxVerticalSpeed = Cast<UCharacterMovementComponent>(TryGetPawnOwner()->GetMovementComponent())->JumpZVelocity;

    // Calculate the falling offset spring.
    float SpringTargetFalling = UKismetMathLibrary::NormalizeToRange(LocalVelocity.Z, 0.0f, MaxVerticalSpeed);

    CurrentSpringFalling = UpdateFloatSpringInterp
    (
        CurrentSpringFalling,
        SpringTargetFalling,
        SpringStateFalling,
        FallingOffsetSpringModelData
    );
}
And that’s it! Now, we just have to plug this last spring into our aim offset:

… and our falling offset is working:
Final Result
With all of our additives, we finally have our finished animation framework!
With this system, the possibilities are endless. By simply subclassing the animation blueprint, switching out our animations, and tweaking our spring models, we can get give all of our characters their own feel and personality!
What’s Next
Our animation blueprint is far from finished. Depending on your project’s needs, you’ll still need to add things like animation slots, left-hand IK for two-handed weapons, etc. For example, here’s what the actual first-person animation blueprint looks like in Cloud Crashers:
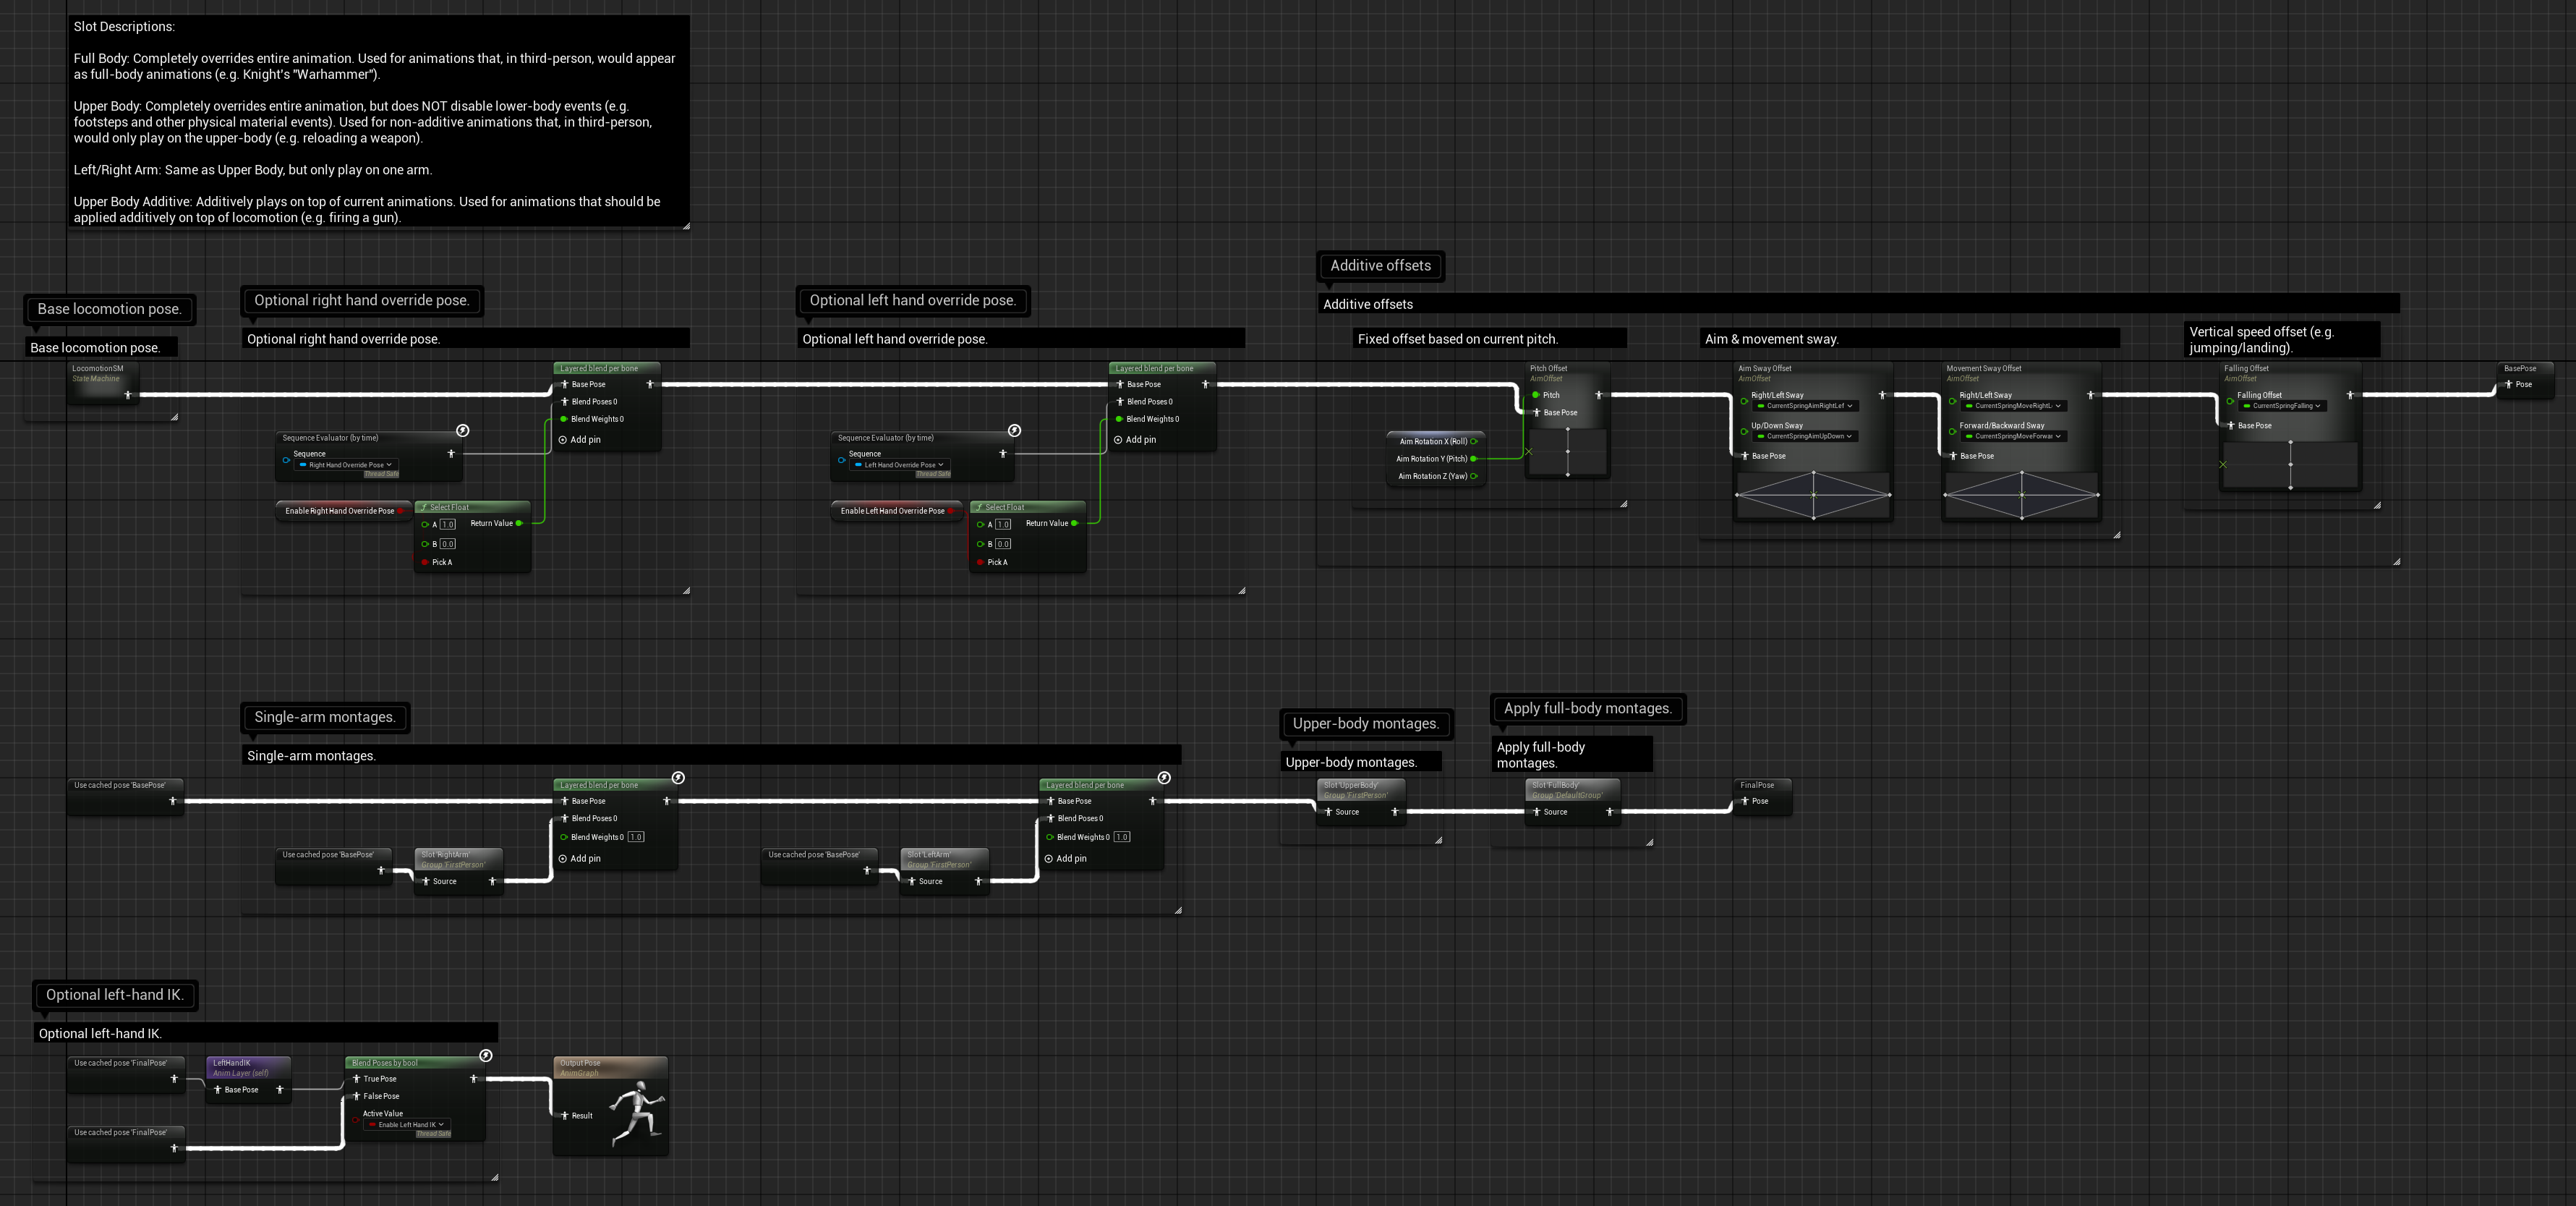
Right-click and "Open image in new tab" if you actually want to see what everything here does.
But, regardless of where you go from here, this system serves as a great foundation. We’ve essentially created a simple framework for driving your base locomotion animations, and whatever else your project needs—whether that’s complex slot blending or procedural contextual animations—can be added on top of this system by extending or modifying it with C++ or the animation blueprint. Where you take this from here is completely up to you.
I hope this article helped or taught you something new, and thanks for reading!